이번 글에서는 Spring Boot MongoDB 세팅과 어떻게 사용하는지 간략하게 파악해볼 간단한 데모 앱을 만들겠습니다.
개발 환경 : STS 4.8.1, JDK 11, Spring Boot 2.6.2 Mongo 5.0.5 Community, Maven 4.0.0
1. Spring Boot 프로젝트 생성
Spring Stater Project 생성하고 중간 의존성 설정 단계에서 아래와 같이 설정하고 생성합니다.
프로젝트, 패키지 명은 적절하게 설정해주세요.
저는 SpringbootMongoDbDemo, com.example.demo 라고 설정했습니다.

아래와 같은 구조를 가진 프로젝트가 생성된 것을 확인할수있습니다.
Customer, CustomerRepository 파일은 다음 과정에서 생성할 파일들입니다.

2. application.properties 파일 설정
설치된 MongoDB는 테스트를 위한 기본 버전으로 username과 password 설정이 없어서 주석처리했습니다.
별도의 Mongo 설정 없이 아래의 설정만으로도 MongoDB에 액세스 가능합니다.
보통 기본 uri가 localhost를 많이 쓰고 database는 미리 test로 생성했습니다.
spring.data.mongodb.uri=mongodb://localhost:27017
spring.data.mongodb.database=test
#spring.data.mongodb.username=
#spring.data.mongodb.passwrod=
3. Customer 객체 생성
Spring boot에서 Mongo를 사용 가능한 방법은 스프링 가이드를 참고해보면
크게 2가지 정도인데, 간단한 CRUD 처리는 MongoRepository를 사용하면 되고
조금 복잡한 작업을 위해서는 MongoTemplate 사용하면 됩니다.
이번 글에서는 MongoRepository 로 간략한 CRUD 테스트를 진행해보겠습니다.
package com.example.demo;

import org.springframework.data.annotation.Id;

public class Customer {

	@Id
	public String id;

	public String firstName;
	public String lastName;

	public Customer() {}

	public Customer(String firstName, String lastName) {
		this.firstName = firstName;
		this.lastName = lastName;
	}

	public String getFirstName() {
		return firstName;
	}

	public void setFirstName(String firstName) {
		this.firstName = firstName;
	}

	public String getLastName() {
		return lastName;
	}

	public void setLastName(String lastName) {
		this.lastName = lastName;
	}

	@Override
	public String toString() {
		return String.format(
				"Customer[id=%s, firstName='%s', lastName='%s']",
				id, firstName, lastName);
	}
}
@Id는 MongoDB의 _id로 맵핑.
이름을 구성하는 아주 간단한 객체입니다.
4. CustomerRepository Interface 생성
package com.example.demo;

import java.util.List;

import org.springframework.data.mongodb.repository.MongoRepository;

public interface CustomerRepository extends MongoRepository<Customer, String> {

	public Customer findByFirstName(String firstName);
	public List<Customer> findByLastName(String lastName);

}
MongoRepository를 상속받는 인터페이스를 생성합니다.
findByFirstName 메소드 성을 기준으로 Customer를 조회 가능하며,
findByLastName 메소드 이름을 기준으로 Customer 목록을 조회 가능합니다.
5. CommandLineRunner 생성 및 서버 스타트
자동 생성된 SpringbootMongoDbDemoApplication.java 파일로 이동하여 CommandLineRunner 구현해줍니다.
Overide된 run 메소드 안에 CRUD 테스트 코드를 작성하고 Boot Dashboard에서 서버를 Start 합니다.
package com.example.demo;

import org.springframework.beans.factory.annotation.Autowired;
import org.springframework.boot.CommandLineRunner;
import org.springframework.boot.SpringApplication;
import org.springframework.boot.autoconfigure.SpringBootApplication;

@SpringBootApplication
public class SpringbootMongoDbDemoApplication implements CommandLineRunner {

	@Autowired
	private CustomerRepository repository;

	public static void main(String[] args) {
		SpringApplication.run(SpringbootMongoDbDemoApplication.class, args);
	}

	@Override
	public void run(String... args) throws Exception {

		// 최초 실행시 삭제
		repository.deleteAll();

		// Customer 객체 생성
		Customer Bob = new Customer("Bob", "Smith");
		Customer John = new Customer("John", "Smith");
		Customer Alice = new Customer("Alice", "Smith");

		// mongoDB에 insert 수행.
		repository.save(Bob);
		repository.save(John);
		repository.save(Alice);

		// mongoDB에 Update 수행.
		Alice.setFirstName("Alice");
		Alice.setLastName("Chris");
		repository.save(Alice);

		// mongoDB에 조회 수행.
		Customer temp = repository.findByFirstName("Bob");
		// mongoDB에 삭제 수행.
		repository.delete(temp);

		System.out.println("Customers found with findAll():");
		System.out.println("-------------------------------");
		for (Customer customer : repository.findAll()) {
			System.out.println(customer);
		}
		System.out.println();

		System.out.println("Customer found with findByFirstName('Alice'):");
		System.out.println("--------------------------------");
		System.out.println(repository.findByFirstName("Alice"));

		System.out.println("Customers found with findByLastName('Smith'):");
		System.out.println("--------------------------------");
		for (Customer customer : repository.findByLastName("Smith")) {
			System.out.println(customer);
		}

	}
}
로그를 확인해보면 작성한 코드대로 CRUD가 이뤄진 것을 확인 가능합니다.

6. MongDB Compass 툴로 데이터 확인
해당 툴은 MongoDB Compass 시 기본 설치되는 툴입니다.
MongoDB Compass 툴로 접속하여 정보를 다시 확인해보겠습니다.
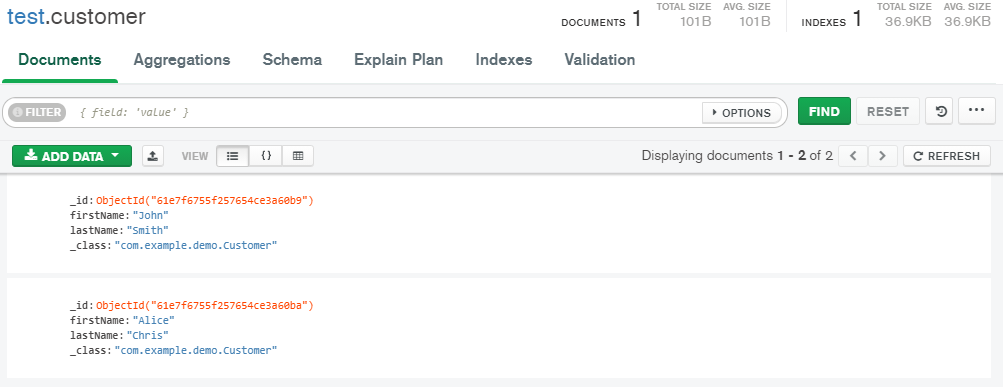
Document에서 데이터를 확인가능합니다.
해당 코드는 Github에서도 확인 가능하며, 하단의 spring 가이드를 토대로 일부 수정됐습니다.
7. 마치며
JPA Demo를 예전에 만들어본적이 있는데요.
블로그에는 추후에 올릴 예정이지만 JPA Repository 와 거의 유사한 패턴을 가지고 있습니다.
경험이 있는 분들이라면 아마 어렵지 않게 작성가능하지 않을까 싶습니다.
'Spring Data Framework' 카테고리의 다른 글
| Spring Boot +Spring Data JPA+MySQL Demo (0) | 2022.01.23 |
|---|---|
| Spring Boot + Spring Data MongoDB + MongoTemplate Demo (0) | 2022.01.22 |