이번 글에서는 Spring RestTemplate에 대해 알아보겠습니다.

실무에서 HttpClient(HttpComponent) 또는 HttpUrlConnection 모듈을 사용한 서버 to 서버 통신이 많이

구현되어 있는 경우를 볼 수 있는데요.

일부 시스템들이나 간혹 다른 분들의 코드를 보면 과거 Wrapper 클래스로 만들 모듈을 그대로 재사용하는 경우가

많습니다. 스프링에서 지원하는 RestTemplate으로 기능 구현하는 것이 스프링 프레임워크를 사용하는 입장에서 

좋지 않나 싶어 구조와 사용법에 대해 정리해보겠습니다.


Spring RestTemplate 

RestTemplate HTTP 클라이언트 라이브러리를 통해 더 높은 수준의 API를 제공합니다.

Spring 3.x 버전부터 지원했으며, Spring 5.x부터는 WebClient를 쓰기를 권장하고 있습니다.

두 라이브러리 가장 큰 차이는 블로킹과 논블로킹 차이라고 간단하게 설명할 수 있습니다.

RestTemplate 기본 설정을 사용하면 UrlConnection과 최대 5개의 커넥션 풀을 갖게 됩니다.

RestTamplate 생성 시 ClientHttpReqeustFactory 부분을 구현하여 Apache HttpComponents

을 사용할 수도 있으며, 커넥션 풀이나 커넥션, 리드 타임아웃 같은 설정들도 세팅 가능합니다.

이러한 여러 가지 편리한 기능 지원으로 개발자는 비즈니스 구현에 더 집중할 수 있는 것 같습니다.

특징

  •  HTTP 요청 후 JSON, XML, String과 같은 다양한 응답을 받을 수 있는 템플릿 지원.
  •  Blocking I/O 기반의 동기방식을 사용.
  •  Header, Contents-Type, Http Method 등 다양한 설정 지원.


서버 to 서버 HTTP 통신에 많이 사용하는 라이브러리

  • URLConnection
    Java.net 패키지에 포함된 라이브러리.
    간단한 HTTP 프로토콜 기반 서비스 기능 구현 시 많이 사용.
  • Apache HttpClient (HttpComponent)
    Apache 재단에서 관리하는 라이브러리로 다양하고 편리한 기능들을 지원하기 때문에
    비교적 HTTP 프로토콜 기반 서비스 기능 구현 시 사용.


기존 라이브러리들 사용의 문제점

URLConnection을 빈도가 높은 기능 구현 시 사용하면 커넥션 풀을 기본적을 지원하지 않기 때문에

TIME_WAIT 상태의 연결이 증가하고 어느 시점에 가면 통신 시 hang이 걸리는 케이스가 확인됩니다.

HttpClient를 사용하더라도 매번 객체를 생성/연결 종료하여 사용하는 케이스가 있는데

이렇게 사용하면 URLConnection을 이용해 구현하는 것과 크게 다를 바가 없는 케이스로 

이럴 경우에도 hang이 걸리는 케이스가 확인됩니다.


기본 설정을 사용한 예제

아래 코드는 헤더 생성, 콘텐츠, Accept 타입 설정하여 uri를 호출하는 간단한 예시입니다.

 // 헤더 객체 생성
HttpHeaders headers = new HttpHeaders();
// 헤더 값 세팅(ex. Authorization)
headers.set(headerName, headerValue); 
// 컨텐츠 타입 세팅
headers.setContentType(MediaType.APPLICATION_JSON); 
// Accept 세팅
headers.setAccept(Collections.singletonList(MediaType.APPLICATION_JSON)); 
// RestTemplate 객체 생성
RestTemplate restTemplate = new RestTemplate(); 
HttpEntity<String> entity = new HttpEntity<String>(headers); 
// 헤더, 메소드, 응답 타입 세팅하여 uri 호출
ResponseEntity<String> responseEntity = restTemplate.exchange(uri, HttpMethod.GET, entity, String.class);
// Response Body 리턴
return responseEntity.getBody();


위와 같이 사용할 경우

new RestTemplate()로 객체 생성하면 exchange() 메서드 호출 시 사용하는 factory를 라이브러리

코드를 추적해보면 HttpAccessor 클래스에 getRequestFactory() 메서드에 의해

requestFactory 값으로 SimpleClientHttpRequestFactory 객체를 세팅하는 것과 HttpURLConnection을 

사용하는 것을 확인 가능하고 5개의 커넥션 풀을 생성하여 기본 설정으로 사용합니다.


HttpClient 커넥션 풀 설정을 사용한 예제 

 // 헤더 객체 생성
HttpHeaders headers = new HttpHeaders();
// 헤더 값 세팅(ex. Authorization)
headers.set(headerName, headerValue); 
// 컨텐츠 타입 세팅
headers.setContentType(MediaType.APPLICATION_JSON); 
// Accept 세팅
headers.setAccept(Collections.singletonList(MediaType.APPLICATION_JSON)); 
// Httpclient 객체 및 커넥션 풀 설정
HttpClient httpClient = HttpClientBuilder.create()
.setMaxConnTotal(50)
.setMaxConnPerRoute(10)
.build();
// factory 및 timeout 설정
HttpComponentsClientHttpRequestFactory factory = new HttpComponentsClientHttpRequestFactory();
factory.setHttpClient(httpClient);
factory.setConnectTimeout(4000);
factory.setReadTimeout(5000);

// RestTemplate Fcatory 설정
RestTemplate restTemplate = new RestTemplate(new BufferingClientHttpRequestFactory(factory));

// RestTemplate 객체 생성
RestTemplate restTemplate = new RestTemplate(); 
HttpEntity<String> entity = new HttpEntity<String>(headers); 
// 헤더, 메소드, 응답 타입 세팅하여 uri 호출
ResponseEntity<String> responseEntity = restTemplate.exchange(uri, HttpMethod.GET, entity, String.class);
// Response Body 리턴
return responseEntity.getBody();

HttpURLConnection 대신 HttpClient(HttpComponent)를 사용하고 커넥션 풀과 Timeout 설정을 추가한 예제입니다.

이렇게 Connection을 재사용해서 이점을 얻으려면 Keep-Alive를 지원하는지 반드시 확인하고 적용해야 합니다.

그리고 잘못 값들을 설정하여 사용할 경우 이점을 얻지 못할 수 있으며, 경우에 따라 성능이 저하될 수도 있습니다.


마치며

다음 글에서는 Spring Boot에서 RestTemplate을 Configuration과 Bean 어노테이션을 사용하여

등록하고 @Autowired를 통한 재사용을 하는 방법을 확인해보겠습니다.


참고

https://docs.spring.io/spring-framework/docs/current/reference/html/integration.html#remoting

https://hc.apache.org/httpcomponents-core-4.4.x/index.html

https://perfectacle.github.io/2021/02/14/simple-client-http-request-factory-connection-pool/

'Spring Boot Framework' 카테고리의 다른 글

Spring Boot Interceptor  (0) 2022.02.18
Spring Rest Docs 와 Swagger (2)  (0) 2022.02.12
Spring Rest Docs 와 Swagger (1)  (0) 2022.02.11
Spring Boot Oauth 2.0 과 JWT Demo (5)  (0) 2022.02.08
Spring Boot Oauth 2.0 과 JWT Demo (4)  (0) 2022.02.06

이번 글에서는 Spring InterCeptor에 대해 Demo를 제작하면서 알아보겠습니다.

모든 소스는 Github에서 확인가능합니다.

Demo의 내용은 Interceptor를 통해 Request를 가로채서 URI 패턴에 따른 응답 처리를 해보겠습니다.

소스 설명에 들어가기에 앞서 간단하게 Spring MVC Request life cycle에 대해 이미지로 확인을 해보면

사용자(Clinet)가 요청이 어떤 단계를 거치게 되는지 알 수가 있습니다.


여기서 눈여겨볼 부분은 HandlerInterceptor 부분인데 이 부분에 대해 실제 구현을 한다고 보면 됩니다.

구조를 보고 Filter 영역에서 처리하면 되는 것이 아닌지에 대해 의문을 갖는 분이 계실 것 같은데

차이점을 설명하자면 실행되는 시점이 다르기때문에 예외 처리에 대한 부분이 다릅니다.

Filter 같은 경우 예외가 발생하면 예외 처리 페이지로 보낸다던지 직접 처리가 어려운 반면

interceptor의 경우에는 예외에 대해 세부적으로 직접 핸들링이 가능합니다.


※ 개발환경 :  JDK 11, STS 4.8.1,  Spring Boot 2.6.3, Maven 4


1. Demo 프로젝트 생성

프로젝트, 패키지 명은 적절하게 선택하여 Spring Stater Project 생성합니다.

의존성 설정은 아래의 pom.xml 파일을 참고해주세요.


2. Demo 프로젝트 구조

아래 이미지와 같은 구조를 가지게 됩니다.

3.  pom.xml 파일 설정

<?xml version="1.0" encoding="UTF-8"?>
<project xmlns="http://maven.apache.org/POM/4.0.0" xmlns:xsi="http://www.w3.org/2001/XMLSchema-instance"
	xsi:schemaLocation="http://maven.apache.org/POM/4.0.0 https://maven.apache.org/xsd/maven-4.0.0.xsd">
	<modelVersion>4.0.0</modelVersion>
	<parent>
		<groupId>org.springframework.boot</groupId>
		<artifactId>spring-boot-starter-parent</artifactId>
		<version>2.6.3</version>
		<relativePath/> <!-- lookup parent from repository -->
	</parent>
	<groupId>com.example</groupId>
	<artifactId>SpringbootHttpInterceptor</artifactId>
	<version>0.0.1-SNAPSHOT</version>
	<name>SpringbootHttpInterceptor</name>
	<description>Demo project for Spring Boot</description>
	<properties>
		<java.version>11</java.version>
	</properties>
	<dependencies>
		<dependency>
			<groupId>org.springframework.boot</groupId>
			<artifactId>spring-boot-starter</artifactId>
		</dependency>

		<dependency>
			<groupId>org.springframework.boot</groupId>
			<artifactId>spring-boot-starter-test</artifactId>
			<scope>test</scope>
		</dependency>
		<dependency>
			<groupId>org.springframework.boot</groupId>
			<artifactId>spring-boot-starter-web</artifactId>
		</dependency>
	</dependencies>

	<build>
		<plugins>
			<plugin>
				<groupId>org.springframework.boot</groupId>
				<artifactId>spring-boot-maven-plugin</artifactId>
			</plugin>
		</plugins>
	</build>

</project>


4. HttpInterceptor 설정 및 추가

4.1  HttpInterceptor 설정 

src/main/java > com.example.demo.config 패키지를 생성하고 HttpInterceptorConfig 클래스를 작성합니다.

package com.example.demo.config;

import org.springframework.beans.factory.annotation.Autowired;
import org.springframework.beans.factory.annotation.Qualifier;
import org.springframework.context.annotation.Configuration;
import org.springframework.web.servlet.HandlerInterceptor;
import org.springframework.web.servlet.config.annotation.InterceptorRegistry;
import org.springframework.web.servlet.config.annotation.WebMvcConfigurer;

@Configuration
public class HttpInterceptorConfig implements WebMvcConfigurer {

	@Autowired
	@Qualifier("httpInterceptor")
	private HandlerInterceptor handlerInterceptor;
	
	@Override
	public void addInterceptors(InterceptorRegistry registry) {
		registry.addInterceptor(handlerInterceptor)
		.addPathPatterns("/demo/user/**")
		.addPathPatterns("/demo/visitor")
		.excludePathPatterns("/demo/product/**");
		
	}
	
}


  • addInterceptors 메서드
    사용할 handlerInterceptor를 추가하고, addPathPatterns을 사용하여 가로챌 URI 패턴에 대해 정의한다.
    excludePathPatrrerns를 사용해서 가로채지 않을 URI 패턴에 대해 정의한다.


4.2 HttpInterceptor 

src/main/java > com.example.demo.common 패키지를 생성하고

HandlerIntercpetor를 구현하는 클래스를 작성합니다.

package com.example.demo.common;

import javax.servlet.http.HttpServletRequest;
import javax.servlet.http.HttpServletResponse;

import org.springframework.http.HttpStatus;
import org.springframework.http.ResponseEntity;
import org.springframework.stereotype.Component;
import org.springframework.web.servlet.HandlerInterceptor;
import org.springframework.web.servlet.ModelAndView;

import com.fasterxml.jackson.databind.ObjectMapper;

@Component
public class HttpInterceptor implements HandlerInterceptor {

	@Override
	public boolean preHandle(HttpServletRequest request, HttpServletResponse response, Object handler)
			throws Exception {
		
		System.out.println("[preHandle]");
		
		try {
		 	String reqUri= request.getRequestURI();
		 	if (reqUri.startsWith("/demo/user/")) {
		 		throw new Exception("사용이 중지된 API 입니다.");
		 	}
		 	
		} catch(Exception e) {
		 	String result = getResponse(e.getMessage(), HttpStatus.OK);
			response.setCharacterEncoding("UTF-8");
			response.setContentType("application/json;charset=utf-8");
			response.getWriter().write(result);
			return false;
		} 
		return true;
	}
	
	@Override
	public void postHandle(HttpServletRequest request, HttpServletResponse response, Object handler,
			ModelAndView modelAndView) throws Exception {
		
		System.out.println("[postHandle]");
		
		HandlerInterceptor.super.postHandle(request, response, handler, modelAndView);
	}
	
	@Override
	public void afterCompletion(HttpServletRequest request, HttpServletResponse response, Object handler, Exception ex)
			throws Exception {
		System.out.println("[afterCompletion]");
		HandlerInterceptor.super.afterCompletion(request, response, handler, ex);
	}
	
	
	private String getResponse(String msg, HttpStatus httpStatus) throws Exception {
	 	ResponseEntity<?> responseEntity = new ResponseEntity<>(msg, httpStatus);
	 	ObjectMapper objectMapper = new ObjectMapper();
		return objectMapper.writeValueAsString(responseEntity);
	}
	
}
  • preHandle 메서드
    Handler를 실행하기 전 실행되는 메서드.
    특정 URI 패턴을 확인하여 컨트롤러 상에 작성된 Request URI와 맵핑되기 전에
    요청을 가로채서 처리합니다.
  • postHandle 메서드
    Handler 실행 후 실행되는 메서드.
  • afterComletion 메서드
    View를 렌더링한 후에 실행되는 메서드.


5. DemoController 

src/main/java > com.example.demo.controller 패키지를 생성하고 DemoController 클래스를 작성합니다.

package com.example.demo.controller;

import java.util.HashMap;

import org.springframework.http.HttpStatus;
import org.springframework.http.ResponseEntity;
import org.springframework.web.bind.annotation.GetMapping;
import org.springframework.web.bind.annotation.PathVariable;
import org.springframework.web.bind.annotation.RestController;

@RestController
public class DemoController {
	
	   @GetMapping("/demo/user/{id}")
	   public ResponseEntity<?> getUserInfoById(@PathVariable("id") String id){
		   HashMap<String, String> map = new HashMap<>();
		   map.put("id", id);
		   map.put("name", "jack");

	       return new ResponseEntity<>(map, HttpStatus.OK);
	   }
	   
	   @GetMapping("/demo/user/{id}/phone")
	   public ResponseEntity<?> getUserPhoneInfo(@PathVariable("id") String id){
		   HashMap<String, String> map = new HashMap<>();
		   map.put("id", id);
		   map.put("phone", "010-1234-1234");

	       return new ResponseEntity<>(map, HttpStatus.OK);
	   }
	   
	   @GetMapping("/demo/product/{id}")
	   public ResponseEntity<?> getUserProductInfo(@PathVariable("id") String id){
		   HashMap<String, String> map = new HashMap<>();
		   map.put("id", id);
		   map.put("name", "ABC");
		   map.put("price", "1000");

	       return new ResponseEntity<>(map, HttpStatus.OK);
	   }
	   
	   @GetMapping("/demo/visitor")
	   public ResponseEntity<?> getSitemap(){
		   HashMap<String, String> map = new HashMap<>();
		   map.put("vistor", "100");
		   
	       return new ResponseEntity<>(map, HttpStatus.OK);
	   }
}

데모 테스트를 위한 API로 서비스, DAO 레이어는 생략했습니다.

  • /demo/user/{id}
    유저 정보를 조회하여 반환하는 API. 
    Interceptor 설정을 통해 등록된 URI 패턴입니다.
  • /demo/user/{id}/phone
    유저 전화번호를 조회하여 반환하는 API. 
    Interceptor 설정을 통해 등록된 URI 패턴입니다.

  • /demo/product/{id}
    상품 정보를 조회하여 반환하는 API.
    Interceptor 설정을 통해 제외 등록된 URI 패턴입니다.

  • /demo/visitor
    방문자 수를 조회하여 반환하는 API.
    Interceptor 설정을 통해 등록된 URI 패턴입니다.

6. 테스트

Spring Boot Dashboard에서 start 합니다.

POST MAN 같은 API 툴을 사용하여 API를 호출합니다.


/demo/visitor 호출 결과입니다.

정상적으로 응답이 오고 Interceptor에 모든 메서드에 로그가 출력된 것을 확인 가능합니다.

post man 결과
콘솔 창

/demo/user/{id}, /demo/user/{id}/phone 호출 결과입니다.

/demo/user/** 으로 설정했기 때문에 /demo/user/ 으로 시작하는 패턴은 모두 가로채 집니다.

post man 결과
콘솔 창

/demo/product/{id} 의 호출 결과입니다.

콘솔 창에는 아무것도 출력되지 않습니다. 가로채기가 제외된 URI 패턴이기 때문입니다.


7. 마치며

간단한 데모를 통하여 Interceptor에 대한 설정과 사용법에 대해 알아봤습니다.

해당 모듈은 공통 처리가 필요한 경우 아주 적절하다고 봅니다.

예를 들어 일부를 제외한 모든 API에 인증 토큰을 검사해야 한다고 한다면 공통 처리하지 않는 경우

해당되는 API에 어떤 식으로든 토큰 검사하는 모듈이 작성되어야 합니다.

만약 수백 개에 이른다고 하면 인터셉터에서 URI 패턴과 preHandler 메서드를 사용하여

비교적 쉽고 빠른 시간 안에 처리 가능하며, 추후에 유지보수도 용이합니다.


※ 참고

https://docs.spring.io/spring-framework/docs/current/reference/html/web.html#mvc-handlermapping-interceptor
https://meetup.toast.com/posts/151

'Spring Boot Framework' 카테고리의 다른 글

Spring RestTemplate (1)  (0) 2022.05.23
Spring Rest Docs 와 Swagger (2)  (0) 2022.02.12
Spring Rest Docs 와 Swagger (1)  (0) 2022.02.11
Spring Boot Oauth 2.0 과 JWT Demo (5)  (0) 2022.02.08
Spring Boot Oauth 2.0 과 JWT Demo (4)  (0) 2022.02.06

1부에 이어서 2부 Swagger에 대해서 Demo을 제작해보고 장단점을 비교해보겠습니다.

모든 소스는 Github에서 확인 가능합니다.


※ 개발환경 :  JDK 11, STS 4.8.1,  Spring Boot 2.6.3, Maven 4


1. Spring Swagger Demo 프로젝트 생성

프로젝트, 패키지 명은 적절하게 선택하여 Spring Stater Project 생성합니다.

의존성 설정은 아래의 pom.xml 파일을 참고해주세요.


2. Spring Swagger  Demo 프로젝트 구조

아래 이미지의 구조를 가지게 됩니다.

3. pom.xml 파일 설정

원래는 springfox-boot-starter 3.0.0 버전을 의존성 설정해야 하지만

Spring Boot 2.6.x 버전에서 컴파일 에러는 아니지만 런타임 에러가 발생했고

찾아보니 2.6.x 버전에서 매우 많은 버그가 있다고 알려져 있어 거의 유사한 사용 방식을 가진

spring-docs-openapi 1.6.4로 의존성으로 마이그레이션을 했습니다.

실제로도 springfox-boot-starter → spring-docs-openapi 의존성을 옮겼을 때

Swagger 설정 빼고는 변경한 내용이 없었습니다.

<?xml version="1.0" encoding="UTF-8"?>
<project xmlns="http://maven.apache.org/POM/4.0.0" xmlns:xsi="http://www.w3.org/2001/XMLSchema-instance"
	xsi:schemaLocation="http://maven.apache.org/POM/4.0.0 https://maven.apache.org/xsd/maven-4.0.0.xsd">
	<modelVersion>4.0.0</modelVersion>
	<parent>
		<groupId>org.springframework.boot</groupId>
		<artifactId>spring-boot-starter-parent</artifactId>
		<version>2.6.3</version>
		<relativePath/> <!-- lookup parent from repository -->
	</parent>
	<groupId>com.example</groupId>
	<artifactId>SpringbootSwagger2Demo</artifactId>
	<version>0.0.1-SNAPSHOT</version>
	<name>SpringbootSwagger2Demo</name>
	<description>Demo project for Spring Boot</description>
	<properties>
		<java.version>11</java.version>
	</properties>
	<dependencies>
		<dependency>
			<groupId>org.springframework.boot</groupId>
			<artifactId>spring-boot-starter-web</artifactId>
		</dependency>

		<dependency>
			<groupId>org.springframework.boot</groupId>
			<artifactId>spring-boot-starter-test</artifactId>
			<scope>test</scope>
		</dependency>
		<!--  <dependency>
        	<groupId>io.springfox</groupId>
        	<artifactId>springfox-boot-starter</artifactId>
        	<version>3.0.0</version>
        	</dependency>-->
        	<dependency>
    			<groupId>org.springdoc</groupId>
    			<artifactId>springdoc-openapi-ui</artifactId>
    			<version>1.6.4</version>
			</dependency> 
         
	</dependencies>

	<build>
		<plugins>
			<plugin>
				<groupId>org.springframework.boot</groupId>
				<artifactId>spring-boot-maven-plugin</artifactId>
			</plugin>
		</plugins>
	</build>
</project>


4. Configuration - OpenApiConfig

OpenAPI 설정에 대한 커스텀 설정을 합니다.

다양한 설정이 가능하나 여기서는 문서가 생성될 때 도메인에 대해 설정합니다.

src/main/java > com.example.demo.config 패키지를 생성하고 OpenApiConfig 클래스를 작성합니다.

package com.example.demo.config;

import org.springframework.context.annotation.Bean;
import org.springframework.context.annotation.Configuration;

//import io.swagger.v3.oas.models.Components;
import io.swagger.v3.oas.models.OpenAPI;
//import io.swagger.v3.oas.models.info.Info;
//import io.swagger.v3.oas.models.info.License;
//import io.swagger.v3.oas.models.security.SecurityScheme;
import io.swagger.v3.oas.models.servers.Server;

@Configuration
public class OpenApiConfig {
	
	@Bean
	public OpenAPI customOpenAPI() {
		return new OpenAPI().addServersItem(new Server().url("http://localhost:8080"));
				//.components(new Components().addSecuritySchemes("basicScheme",
						//new SecurityScheme().type(SecurityScheme.Type.HTTP).scheme("basic")))
						//.info(new Info().title("Spring API").version("V1")
						//.license(new License().name("Apache 2.0").url("http://springdoc.org")));
	}
}


5. Entitiy - User 

src/main/java > com.example.demo.entity 패키지를 생성하고 User 클래스를 작성합니다.

DemoController에서 응답 객체로 HashMap을 사용하는데 현재로서는 HashMap이 포함하는 변수들에 대한
상세 설명을 직접 작성할 수 있는 방법을 찾을 수 없었습니다.

따라서 User 클래스를 작성하고 문서 상 설명을 보여줄 수 있게 작성합니다.

package com.example.demo.entity;

import io.swagger.v3.oas.annotations.media.Schema;

@Schema(description = "유저")
public class User{
	
	@Schema(description = "유저 고유번호")
	private String id;
	
	@Schema(description = "유저 명")
	private String name;
	
	@Schema(description = "유저 이메일")
	private String email;

	public String getId() {
		return id;
	}

	public void setId(String id) {
		this.id = id;
	}

	public String getName() {
		return name;
	}

	public void setName(String name) {
		this.name = name;
	}

	public String getEmail() {
		return email;
	}

	public void setEmail(String email) {
		this.email = email;
	}
}


6. DemoController 

src/main/java > com.example.demo.controller 패키지를 생성하고 DemoController 클래스를 작성합니다.

package com.example.demo.controller;

import java.util.HashMap;

import org.springframework.http.HttpStatus;
import org.springframework.http.ResponseEntity;
import org.springframework.web.bind.annotation.GetMapping;
import org.springframework.web.bind.annotation.PathVariable;
import org.springframework.web.bind.annotation.PostMapping;
import org.springframework.web.bind.annotation.RequestParam;
import org.springframework.web.bind.annotation.RestController;

import com.example.demo.entity.User;

import io.swagger.v3.oas.annotations.Operation;
import io.swagger.v3.oas.annotations.Parameter;
import io.swagger.v3.oas.annotations.media.Content;
import io.swagger.v3.oas.annotations.media.Schema;
import io.swagger.v3.oas.annotations.responses.ApiResponse;
import io.swagger.v3.oas.annotations.responses.ApiResponses;

@RestController
public class DemoController {

	   @Operation(summary = "getUserInfoById")
	   @ApiResponses(value = {
			   @ApiResponse(responseCode ="200", description="유저 정보 조회 성공", 
					   content = { @Content(mediaType = "application/json", schema = @Schema(implementation = User.class)) }),
	   })
	   @GetMapping("/demo/user/{id}")
	   public ResponseEntity<?> getUserInfoById(@Parameter(description="유저 고유번호") @PathVariable("id") String id){

		   HashMap<String, String> map = new HashMap<>();
		   map.put("id", id);
		   map.put("name", "jack");
		   map.put("email", "jack@abc.com");

	       return new ResponseEntity<>(map, HttpStatus.OK);
	   }

	   @Operation(summary = "registUserInfo")
	   @ApiResponses(value = {
			   @ApiResponse(responseCode ="200", description="유저 등록 성공", 
					   content = { @Content(mediaType = "application/json", schema = @Schema(implementation = User.class)) }),
	   })
	   @PostMapping("/demo/user")
	   public ResponseEntity<?> registUserInfo(@Parameter(schema = @Schema(implementation = User.class)) @RequestParam HashMap<String, String> map) {
		   return new ResponseEntity<>(map, HttpStatus.OK);
	   }
}


  • @Opertation
    HTTP 메서드에 대해 설명.
  • @ApiResponse
    응답에 대해 나타냅니다.

  • @Content
    특정 미디어 유형에 대한 스키마 및 예시를 제공.

  • @Scheme
    입력 및 출력 데이터의 정의.

  • @Parameter
    단일 매개변수에 대해 나타냅니다.

어노테이션에 대한 상세 설명과 예시는 아래를 링크를 참고해주세요.

Swagger 2.x wiki
Migrating from SpringFox


7. 테스트

Spring Boot Dashboard에서 Start 합니다.

정상적으로 Start 됐으면 브라우저에서 http://localhost:8080/swagger-ui.html 주소로 접근하여

아래와 같이 API 문서를 확인 가능합니다.

실제 서비스에서는 해당 경로에 대한 접근 보안 설정은 필수로 추가해야 합니다.

그렇지 않을 경우 누구나 접근 가능한 경로가 됩니다.

정의된 API를 클릭하여 어노테이션 코드로 작성한 설명들과 예시를 볼 수 있으며,

POST MAN 같은 API 툴처럼 값을 입력하여 API 테스트도 가능합니다.


8. 마치며

Spring Rest Docs와 Swagger Demo를 작성해봤습니다.

Swagger Demo를 작성하면서 느낀 장단점은 아래와 같습니다.

  • 장점
    테스트 코드의 작성 필요가 없다.
    API 테스트가 가능.

  • 단점
    테스트 코드를 통해 작성된 문서가 아니기 때문에 신뢰도가 상대적으로 떨어진다.
    프로덕션 코드에 작성 코드가 포함된다.
    Map의 경우 직접적으로 설명을 작성하기가 어렵다.
    Swagger 어노테이션으로 대부분 작성하므로 학습 필요.

Spring Rest Docs와 Swagger은 장단점은 극명한 것 같습니다.

하지만 어떤 것이 좋을지는 환경과 비즈니스 요구사항에 맞춰서 대응해야 한다고 봅니다.


  • 레거시 프로젝트가 있고, 많은 양의 API가 있는데 빠른 시간 내에 API 문서가 필요하다면?
    Spring Rest Docs를 적용하게 되면 전부 테스트 코드를 작성해줘야 하고
    따라서 시간이 매우 소모되는 작업이므로 적합하지 않을 수 있습니다.
    물론 둘 다 모르는 것에 학습은 해야 되지만 개인적으로는 Swagger가 훨씬 작성하기는 쉬워 보였습니다.

  • 처음 시작하는 프로젝트이고 신뢰성 있는 API 문서가 필요하다면?
    Spring Rest Docs를 적용하게 되면 전부 테스트 코드 작성해야 하지만 
    검증된 신뢰성 있는 API 문서를 얻을 수 있습니다.

  이외에도 프로덕션 코드에 코드 추가 여부나 작업자의 학습도, 역량에 따라서 달라질 수 있다고 봅니다.

  하지만 장기적으로 봤을 때는 Spring Rest Docs를 적용하는 게 TDD 개발을 하는 곳이라면 낫지 않을까 싶습니다.


※ 참고

https://springdoc.org/#migrating-from-springfox

https://github.com/springdoc/springdoc-openapi/issues/89

https://springdoc.org/#demos

https://github.com/swagger-api/swagger-core/wiki/Swagger-2.X---Annotations

https://github.com/swagger-api/swagger-core/issues/3080

https://www.baeldung.com/spring-rest-openapi-documentation

https://github.com/springfox/springfox-demos

http://springfox.github.io/springfox/docs/current/#springfox-spring-mvc-and-spring-boot

'Spring Boot Framework' 카테고리의 다른 글

Spring RestTemplate (1)  (0) 2022.05.23
Spring Boot Interceptor  (0) 2022.02.18
Spring Rest Docs 와 Swagger (1)  (0) 2022.02.11
Spring Boot Oauth 2.0 과 JWT Demo (5)  (0) 2022.02.08
Spring Boot Oauth 2.0 과 JWT Demo (4)  (0) 2022.02.06

개인 프로젝트는 토이 프로젝트가 많다 보니 아무래도 필요성이 조금 떨어지기는 하지만

현업에서 드는 생각은 API 문서는 필수라는 겁니다.

WEB API를 개발하는 웹 개발자는 본인이 개발하기 때문에 어떤 요청 변수가 필요한지

어떤 응답이 갈지 다 이해하고 있지만 만약 프론트-엔드 파트가 나눠졌다면

프론트-엔드 개발자는 정확히 알기가 어렵습니다.

또한 요새는 B2C 서비스 같은 경우 모바일 서비스는 필수에 가깝기때문에

상황에 따라 AOS/IOS 개발자가 모바일 파트를 담당할 수 있고 개발을 진행하려면 당연히 API 문서가 필수입니다.

API 부재로 구두로 소통하다 보면 당연히 파편화된 기능 개발이 될 수밖에 없습니다.

그리고 시간이 경과함에 따라 인간의 기억은 한계가 있고, 매번 소스를 다시 보면서

API 동작을 파악하는 것도 어렵고 힘든 일입니다.

하지만 매번 API 문서를 작성하는 건 시간적 비용이 상당하고 이미 기 개발된 소스의 경우 더욱 어렵습니다.

문득 자동화할 수 없을까라는 생각이 들어 스쳐 지나가면서 들은 JAVA 생태계에서

대표적인 Spring Rest Docs와 Swagger에 대해 파악해보는 글입니다.

데모를 만들어보고 장단점을 비교해보려고 합니다.


1부는 Spring Rest Docs Demo 

2부는 Swagger Demo 


모든 소스는 Github에서 확인 가능합니다.


※ 개발환경 :  JDK 11, STS 4.8.1,  Spring Boot 2.6.3, Maven 4


Spring Rest Docs는 아래 요건을 충족해야합니다. 

해당 환경보다 하위 환경에서는 동작하지 않습니다.

  • 자바 8
  • 스프링 프레임워크 5(5.0.2 이상)

1. Spring Rest Docs Demo 프로젝트 생성

프로젝트, 패키지 명은 적절하게 선택하여 Spring Stater Project 생성합니다.

의존성 설정은 아래의 pom.xml 파일을 참고해주세요.


2. Spring Rest Docs Demo 프로젝트 구조

아래 이미지와 같은 구조를 가지게 됩니다.


3.  pom.xml 파일 설정

<?xml version="1.0" encoding="UTF-8"?>
<project xmlns="http://maven.apache.org/POM/4.0.0" xmlns:xsi="http://www.w3.org/2001/XMLSchema-instance"
	xsi:schemaLocation="http://maven.apache.org/POM/4.0.0 https://maven.apache.org/xsd/maven-4.0.0.xsd">
	<modelVersion>4.0.0</modelVersion>
	<parent>
		<groupId>org.springframework.boot</groupId>
		<artifactId>spring-boot-starter-parent</artifactId>
		<version>2.6.3</version>
		<relativePath/> <!-- lookup parent from repository -->
	</parent>
	<groupId>com.example</groupId>
	<artifactId>SpringbootRestDocDemo2</artifactId>
	<version>0.0.1-SNAPSHOT</version>
	<name>SpringbootRestDocDemo2</name>
	<description>Demo project for Spring Boot</description>
	<properties>
		<java.version>11</java.version>
	</properties>
	<dependencies>
		<dependency>
			<groupId>org.springframework.boot</groupId>
			<artifactId>spring-boot-starter-web</artifactId>
		</dependency>
		<dependency>
			<groupId>org.springframework.boot</groupId>
			<artifactId>spring-boot-starter-test</artifactId>
			<scope>test</scope>
		</dependency>
		<dependency>
			<groupId>org.springframework.restdocs</groupId>
			<artifactId>spring-restdocs-mockmvc</artifactId>
			<scope>test</scope>
		</dependency>
	</dependencies>

	<build>
		<plugins>
			<plugin>
				<groupId>org.asciidoctor</groupId>
				<artifactId>asciidoctor-maven-plugin</artifactId>
				<version>1.5.8</version>
				<executions>
					<execution>
						<id>generate-docs</id>
						<phase>prepare-package</phase>
						<goals>
							<goal>process-asciidoc</goal>
						</goals>
						<configuration>
							<backend>html</backend>
							<doctype>book</doctype>
						</configuration>
					</execution>
				</executions>
				<dependencies>
					<dependency>
						<groupId>org.springframework.restdocs</groupId>
						<artifactId>spring-restdocs-asciidoctor</artifactId>
						<version>2.0.6.RELEASE</version>
					</dependency>
				</dependencies>
			</plugin>
			<plugin>
				<groupId>org.springframework.boot</groupId>
				<artifactId>spring-boot-maven-plugin</artifactId>
			</plugin>
			 <plugin>
                <artifactId>maven-resources-plugin</artifactId>
                <executions>
                    <execution>
                        <id>copy-resources</id>
                        <phase>prepare-package</phase>
                        <goals>
                            <goal>copy-resources</goal>
                        </goals>
                        <configuration>
                            <outputDirectory>
                                ${project.build.outputDirectory}/static/docs
                            </outputDirectory>
                            <resources>
                                <resource>
                                    <directory>
                                        ${project.build.directory}/generated-docs
                                    </directory>
                                </resource>
                            </resources>
                        </configuration>
                    </execution>
                </executions>
            </plugin>
		</plugins>
	</build>
</project>


  •  spring-restdocs-mockmvc 의존성 추가
     MockMvc, WebTestClient, REST Assured 중 MVC 패턴의 API 문서를 위한 것

  • spring-restdocs-asciidoctor 의존성을 추가
    snippet이 사용할 속성으로 .adoc을 가리키도록 자동 구성됩니다.

  • maven-resources-plugin의 prepare-package 추가
    리소스 플러그인을 통해  jar 파일에 /generated-docs 생성된 파일을 포함하게 설정합니다.

4. DemoController 

src/main/java > com.example.demo.controller 패키지를 생성하고 DemoController 클래스를 작성합니다.

package com.example.demo.controller;

import java.util.HashMap;

import org.springframework.http.HttpStatus;
import org.springframework.http.ResponseEntity;
import org.springframework.web.bind.annotation.GetMapping;
import org.springframework.web.bind.annotation.PathVariable;
import org.springframework.web.bind.annotation.PostMapping;
import org.springframework.web.bind.annotation.RequestParam;
import org.springframework.web.bind.annotation.RestController;

@RestController
public class DemoController {

	   @GetMapping("/demo/user/{id}")
	   public ResponseEntity<?> getUserInfoById(@PathVariable("id") String id){

		   HashMap<String, String> map = new HashMap<>();
		   map.put("id", id);
		   map.put("name", "jack");
		   map.put("email", "jack@abc.com");

	       return new ResponseEntity<>(map, HttpStatus.OK);
	   }

	   @PostMapping("/demo/user")
	   public ResponseEntity<?> registUserInfo(@RequestParam HashMap<String, String> map) {
		   return new ResponseEntity<>(map, HttpStatus.OK);
	   }
}


  • /demo/user/{id}
    user 정보를 식별자(id)에 따라 조회하는 API입니다.
    Demo 테스트 용으로  id, name, email 값을 고정값을 세팅하여 리턴합니다.

  • /demo/user
    Demo 테스트 용으로 user 정보를 등록하는 API로 map 포맷으로 요청 변수를 받아서 리턴합니다.


5. DemoTest

src/test/java > com.example.demo.controller 패키지를 생성하고 DemoTest 클래스를 작성합니다.

Junit 5 기반으로 작성했으며, 해당 링크를 보시면 Junit 4 코드도 확인 가능합니다.

package com.example.demo.controller;

import static org.springframework.restdocs.mockmvc.MockMvcRestDocumentation.document;
import static org.springframework.restdocs.mockmvc.MockMvcRestDocumentation.documentationConfiguration;
//import static org.springframework.test.web.servlet.request.MockMvcRequestBuilders.get;
import static org.springframework.test.web.servlet.request.MockMvcRequestBuilders.post;
import static org.springframework.test.web.servlet.result.MockMvcResultHandlers.print;
import static org.springframework.test.web.servlet.result.MockMvcResultMatchers.status;

import org.junit.jupiter.api.BeforeEach;
import org.junit.jupiter.api.Test;
import org.junit.jupiter.api.extension.ExtendWith;

import org.springframework.boot.test.context.SpringBootTest;
import org.springframework.restdocs.RestDocumentationContextProvider;
import org.springframework.restdocs.RestDocumentationExtension;
import org.springframework.restdocs.mockmvc.RestDocumentationRequestBuilders;
import org.springframework.test.context.junit.jupiter.SpringExtension;

import org.springframework.test.web.servlet.MockMvc;
import org.springframework.test.web.servlet.setup.MockMvcBuilders;
import org.springframework.web.context.WebApplicationContext;

//import static org.springframework.restdocs.operation.preprocess.Preprocessors.preprocessRequest;
//import static org.springframework.restdocs.operation.preprocess.Preprocessors.preprocessResponse;
//import static org.springframework.restdocs.operation.preprocess.Preprocessors.prettyPrint;
import static org.springframework.restdocs.payload.PayloadDocumentation.fieldWithPath;
import static org.springframework.restdocs.payload.PayloadDocumentation.responseFields;
import static org.springframework.restdocs.request.RequestDocumentation.*;

@ExtendWith({RestDocumentationExtension.class, SpringExtension.class})
@SpringBootTest
public class DemoTest {
		
     private MockMvc mockMvc;

     @BeforeEach
     public void setUp(WebApplicationContext webApplicationContext, RestDocumentationContextProvider restDocumentation) {
        this.mockMvc = MockMvcBuilders.webAppContextSetup(webApplicationContext)
                .apply(documentationConfiguration(restDocumentation))
                //.alwaysDo(document("{method-name}/{class-name}", preprocessRequest(prettyPrint()), preprocessResponse(prettyPrint())))
                .build();
     }
    
     @Test
	 public void getUserInfoById() throws Exception{
	       this.mockMvc.perform(RestDocumentationRequestBuilders.get("/demo/user/{id}", "user1"))
	       			.andDo(print())
			       .andExpect(status().isOk())
			       .andDo(document("get-user-info-by-Id", 
			    		   pathParameters( 
								parameterWithName("id").description("유저 고유번호") 
			               ),
			    		   responseFields(
			                    fieldWithPath("id").description("유저 고유번호"),
			                    fieldWithPath("name").description("유저 명"),
			                    fieldWithPath("email").description("유저 이메일")
			               )
			       ));
	  }
     
 	@Test
	 public void registUserInfo() throws Exception{
	      this.mockMvc.perform(post("/demo/user")
	    		  .param("id", "user2")
	    		  .param("name","paul")
	    		  .param("email","paul@gmail.com")
	    		  )
	      		  .andDo(print())
	              .andExpect(status().isOk())
	              .andDo(document("regist-user-info",
	                       responseFields(
	                               fieldWithPath("id").description("유저 고유번호"),
	                               fieldWithPath("name").description("유저 명"),
	                               fieldWithPath("email").description("유저 이메일")
	                              )
	              ));
	  }
}


  • setup 메서드
    mockMvc 인스턴스를 사용하여 구성. 
    스니펫은 기본적으로 6개 curl, http-request, http-resonse, httpie-request, request-body, resonse-body를 생성.
    /target/generated-snippets/~ 에서 생성된 스니펫 확인 가능합니다.

  • getUserInfoById 메서드
    DemoController의 /demo/user/{id} API의 테스트 코드입니다.
    pathParameter는 @Pathvariable로 받는 id 값의 테스트를 위한 설정인데
    사용할 경우 mockMvcBuilder를 사용하면 컴파일 타임에서 괜찮지만 mvc install 과정에서 Exception이 발생합니다.

    urlTemplate not found.
    If you are using MockMvc did you use RestDocumentationRequestBuilders to build the request?

    메시지 권고대로 mockMvcBuilder 대신 RestDocumentationRequestBuilders를 사용하면 에러가 발생하지 않습니다.

  • registUserInfo 메서드
    DemoController의 /demo/user API의 테스트 코드입니다.

  • 기타
    @ExtendWith는 Junit5 설정이다. spring rest docs 공식 레퍼런스에도 잘 설명되어있습니다.
    Junit4와 설정 차이가 좀 있으니 서두에서 이야기한 Junit4 Demo와 비교해보기를 바랍니다.

6. api-docs.adoc

/src/main/asciidoc 경로에 파일을 생성합니다.

해당 파일을 통해 html 파일을 생성합니다.
여기서는 api-docs.html 파일이 /target/generated-docs 경로에 생성됩니다.

 Demo Project API 명세 (Spring REST Docs)

== getUserInfoById
​
Curl request

include::{snippets}/get-user-info-by-id/curl-request.adoc[]
​
HTTP request
​
include::{snippets}/get-user-info-by-id/http-request.adoc[]

Path Parameter

include::{snippets}/get-user-info-by-id/path-parameters.adoc[]

HTTP Response
​
include::{snippets}/get-user-info-by-id/http-response.adoc[]
​
Response Fields

include::{snippets}/get-user-info-by-id/response-fields.adoc[]
​
Request Body
​
include::{snippets}/get-user-info-by-id/request-body.adoc[]
​
Response Body
​
include::{snippets}/get-user-info-by-id/response-body.adoc[]


== registUserInfo
​
Curl Request
​
include::{snippets}/regist-user-info/curl-request.adoc[]
​
HTTP Request
​
include::{snippets}/regist-user-info/http-request.adoc[]


HTTP Response
​
include::{snippets}/regist-user-info/http-response.adoc[]

Response Fields

include::{snippets}/regist-user-info/response-fields.adoc[]
​
Request Body
​
include::{snippets}/regist-user-info/request-body.adoc[]
​
Response Body
​
include::{snippets}/regist-user-info/response-body.adoc[]


7. 테스트

mvn install을 수행하여 테스트를 정상 통과하면 빌드가 완료됩니다.

만약 테스트 실패 시 api-docs.html 파일은 생성되지 않으며,

api-docs.adoc의 작성에 따라 알아보기 힘든 포맷의 파일이 생성되기도 하니 주의해야 합니다.

아래 이미지는 빌드 완료 후 생성된 파일 정보입니다.


taget folder


이제 생성된 api-docs.html을 브라우저에서 열어보면 아래 이미지와 같이 API 정보가 내용을 확인할 수 있습니다.


7. 마치며

Spring Rest Docs Demo를 만들고 결과물까지 확인해봤습니다.

Demo를 작성하면서 느낀 Spring Rest Docs의 장단점을 써보겠습니다.


  • 장점
    테스트 코드를 통해 작성된 문서이기 때문에 신뢰도가 높다.
    프로덕션 코드는 건들지 않는다.
  • 단점
    Rest Docs, Junit, Asciidoc의 학습이 필요.
    만약 TDD 환경이 아닌 곳은 테스트 코드 작성 필요.


다음 2부에서는 Swagger Demo를 제작하고 장단점을 비교해보겠습니다.


※ 참고

https://docs.spring.io/spring-restdocs/docs/2.0.6.RELEASE/reference/html5

https://www.baeldung.com/spring-rest-docs

이전 글에 이어서 Resource Server를 Spring Security Oauth 없이 구현해보겠습니다.

전체 소스는 Github에 있습니다.


※ 개발 환경 : STS 4.8.1, JDK 1.8, Spring Boot 2.1.6, Mybatis 2.1, MySQL Community 5.6, Maven 4.0.0


1. Resource Server 구현을 위한 Spring Boot 프로젝트 생성 및 의존성 설정

프로젝트, 패키지 명은 적절하게 선택하여 Spring Stater Project 생성합니다.

의존성 설정은 아래의 pom.xml 파일을 참고해주세요.


2. Resource Server 프로젝트 구조

아래 이미지와 같은 구조를 가지게 됩니다.

- com.codjecd.common : Custom Exception 등 Custom 패키지, MessageProperties 등 공통 컴포넌트 패키지

- com.codejcd.config : 각종 설정 파일들의 패키지

- com.codejcd.dao : DB 액세스를 파일들을 위한 패키지

- com.codejcd.service : 서비스 레이어 패키지

- com.codejcd.controller : 컨트롤러 레이어 패키지

- com.codejcd.util : 유틸 파일 패키지


3. Message Source 설정

Exception 등 서버에서 처리할 메시지를 정의하고 맵핑하는 설정.
/src/main/resources/messages/ message.*.properties 파일들과 맵핑됩니다.

Locale을 KOREA로 설정했기떄문에 message.ko.properties 가 기본 메시지 프로퍼티로 사용됩니다.


3.1 Message Source Configuration

package com.codejcd.config;

import java.util.Locale;

import org.springframework.context.MessageSource;
import org.springframework.context.annotation.Bean;
import org.springframework.context.annotation.Configuration;
import org.springframework.context.support.ReloadableResourceBundleMessageSource;

/**
 * 메시지 설정
 */
@Configuration
public class MessageSourceConfiguration {

	@Bean
	public MessageSource messageSource() {
		ReloadableResourceBundleMessageSource source = new ReloadableResourceBundleMessageSource();

	    source.setBasename("classpath:/messages/message");
	    source.setDefaultEncoding("UTF-8");
	    source.setCacheSeconds(10);
	    source.setUseCodeAsDefaultMessage(true);
	    Locale.setDefault(Locale.KOREA);
	   
	    return source;
	}


}


3.2 Message Source Properties

src/main/resources/messages 폴더를 생성하고 message_ko.properties 파일을 생성합니다.

code와 message 값을 정의합니다.
프로젝트의 크기에 따라 code 의 범위는 적절하게 조절하세요.
여기서는 데모 앱이므로 범위가 작습니다.

error.code.common.success=000
error.message.common.success=Process Success

error.code.common.occured.exception=999
error.message.common.occured.exception=Process Fail

error.code.userId.invalid=000
error.message.userId.invalid=User ID is invalid

error.code.userPassword.invalid=001
error.message.userPassword.invalid=User Password is invalid

error.code.token.expiration.invalid=010
error.message.token.expiration.invalid=token is invalid

error.code.token.expiration=011
error.message.token.expiration=token is expired

error.code.token.issuer.invalid=012
error.message.token.issuer.invalid=issuer is invalid

error.code.token.audience.invalid=013
error.message.token.audience.invalid=audience is invalid

error.code.token.id.invalid=014
error.message.token.id.invalid=token ID is invalid

error.code.authorization.invalid=020
error.message.authorization.invalid=authorization is invalid


3.3 Message Properties

MessageSoruceAware를 상속받는 클래스.

3.2에 정의한 properties 파일에서 key, vaule 관계로 정의한 코드, 메시지 값을 가져와 

정의한 메서드 통해 사용할 수 있다.


예시) MessageProperties.prop("error.code.common.occured.exception") 

package com.codejcd.common;

import java.text.MessageFormat;
import java.util.Locale;
import org.springframework.context.MessageSource;
import org.springframework.context.MessageSourceAware;
import org.springframework.stereotype.Component;
import javax.servlet.http.HttpServletRequest;

/**
 * Message Component
 * 커스터마이징 메시지 
 */
@Component
public class MessageProperties implements MessageSourceAware{
	
    private static MessageSource messageSource;

    public void setMessageSource (MessageSource messageSource) {
        MessageProperties.messageSource = messageSource;
    }

    public static String prop(String key) {
        return messageSource.getMessage(key, null, Locale.KOREA);
    }

    public static String prop(String key,  HttpServletRequest request) {
        return MessageProperties.msg(key, request);
    }

    public static String prop(String key, Locale locale) {
        return MessageProperties.msg(key, locale);
    }

    public static String propFormat(String key, HttpServletRequest request, Object...objects) {
        return MessageFormat.format(MessageProperties.msg(key, request), objects);
    }

    public static String propFormat(String key, Locale locale, Object...objects) {
        return MessageFormat.format(MessageProperties.msg(key, locale),objects);
    }

     public static String msg(String key, HttpServletRequest request){
         return messageSource.getMessage(key, null, Locale.KOREA);
     }

     public static String msg(String key, Locale locale){
         return messageSource.getMessage(key, null, locale);
     }

}


4. application.properties

서버 포트를 위한 설정만 있습니다.

server.port=8096


5. jwt.properties 

JWT 설정 값들을 관리하는 파일입니다.

JWT Access Token 과 Refresh Token 복호화에 필요한 값들.

jwt.secretKey=1523adjk@#
jwt.expireDay=3
jwt.issuer=codejcd
jwt.audience=codejcd_client
jwt.subject=access_token


6. Custom Exception 

Custom Exception을 처리하기 위한 클래스입니다.

Exception 클래스를 상속 받고 error code, message, description을 처리하기 위한 멤버 변수를 가집니다.


package com.codejcd.common;

/**
 * Customize Exception 
 * 커스터마이징 예외 처리 
 */
public class CustomException extends Exception {
	private static final long serialVersionUID = -3642478745758696786L;
	private String errorCode;
	private String errorMessage;
	private String errorDescription;
	
	public CustomException() {
	
	}
	
	public CustomException(String errorCode, String errorMessage) {
		this.errorCode = errorCode;
		this.errorMessage = errorMessage;
	}
	
	public CustomException(String errorCode, String errorMessage, String errorDescription) {
		this.errorCode = errorCode;
		this.errorMessage = errorMessage;
		this.errorDescription = errorDescription;
	}
	
	public String getErrorCode() {
		return errorCode;
	}
	public void setErrorCode(String errorCode) {
		this.errorCode = errorCode;
	}
	public String getErrorMessage() {
		return errorMessage;
	}
	public void setErrorMessage(String errorMessage) {
		this.errorMessage = errorMessage;
	}
	public String getErrorDescription() {
		return errorDescription;
	}
	public void setErrorDescription(String errorDescription) {
		this.errorDescription = errorDescription;
	}
}


7. Custom Response 

응답을 위한 Response 객체를 구현.

응답 코드(responseCode), 응답 메시지(responseMessage), 응답 결과 객체(result)를 멤버 변수로 가진다.

package com.codejcd.common;

/**
 * Customize Response
 * 커스터마이징 응답 객체
 */
public class Response {

	private String responseCode;
	private String responseMessage;
	private Object result;
	public String getResponseCode() {
		return responseCode;
	}
	public void setResponseCode(String responseCode) {
		this.responseCode = responseCode;
	}
	public String getResponseMessage() {
		return responseMessage;
	}
	public void setResponseMessage(String responseMessage) {
		this.responseMessage = responseMessage;
	}
	public Object getResult() {
		return result;
	}
	public void setResult(Object result) {
		this.result = result;
	}
}


8. Date Utill 

날짜, 시간 계산을 편하게 하기 위한 유틸 클래스.

메서드 설명은 이전 글을 참고해주시기 바랍니다.

package com.codejcd.util;

import java.text.ParsePosition;
import java.text.SimpleDateFormat;
import java.util.Calendar;
import java.util.Date;

public class DateUtil {

	public static final String YYYYMMDDHHmm = "yyyyMMddHHmm";
	
    public static Date getDate(String dateString, String format) throws Exception{
    	SimpleDateFormat formatter = new SimpleDateFormat(format);
    	ParsePosition pos = new ParsePosition(0);
    	return formatter.parse(dateString, pos);
    }
	
	public static String getNow(String fromFormat) {
		Calendar cal = Calendar.getInstance();
		Date today = cal.getTime();
		SimpleDateFormat formatter = new SimpleDateFormat(fromFormat);
		return formatter.format(today);
	}
	
	public static Date getNowDate() {
		Calendar cal = Calendar.getInstance();
		return cal.getTime();
	}
	
    public static String addDate(String dateString, String format, int days){
    	Calendar cal = Calendar.getInstance();
    	SimpleDateFormat formatter = new SimpleDateFormat(format);
        ParsePosition pos = new ParsePosition(0);
        cal.setTime(formatter.parse(dateString, pos));
        cal.add(Calendar.DATE,days);

		return formatter.format(cal.getTime());
    }
    
    public static boolean isBefore(Date from, Date to) {
		if (from == null || to == null) {
			return false;
		}
		if (to.before(from)) {
			return false;
		}
		return true;
	}

}


9. Resource Controller

RestController 어노테이션을 통해 Bean 등록을 하고 JSON 포맷으로 데이터를 리턴합니다.

package com.codejcd.controller;

import org.springframework.beans.factory.annotation.Autowired;
import org.springframework.web.bind.annotation.RequestHeader;
import org.springframework.web.bind.annotation.RequestMapping;
import org.springframework.web.bind.annotation.RestController;

import com.codejcd.common.CustomException;
import com.codejcd.common.MessageProperties;
import com.codejcd.common.Response;
import com.codejcd.service.TokenService;

/**
 * 리소스 컨트롤러
 */
@RestController
public class ResourceController {

	@Autowired
	private TokenService tokenService;
	
	/**
	 * 제한된 자원의 접근 API
	 * @param bearerToken
	 * @return
	 */
    @RequestMapping("/resource")
    public Response resource(@RequestHeader(value="Authorization") String bearerToken) {
    	Response response = new Response();
    	
    	try {
    		if (tokenService.checkAccessToken(bearerToken)) { // token 검증, token 검증은 각 API에 Aspect나 Intercepter를 활용하여 공통 처리도 가능. 
    			// 리소스 접근
            	response.setResponseCode(MessageProperties.prop("error.code.common.success"));
        		response.setResponseMessage(MessageProperties.prop("error.message.common.success"));
    		}
    	} catch (CustomException e) {
    		response.setResponseCode(MessageProperties.prop(e.getErrorCode()));
    		response.setResponseMessage(MessageProperties.prop(e.getErrorMessage()));
    	} catch (Exception e) {
            response.setResponseCode(MessageProperties.prop("error.code.common.occured.exception"));
            response.setResponseMessage(MessageProperties.prop("error.message.common.occured.exception"));
            e.printStackTrace();
    	} finally {
    		
    	}
    	return response;
    }
}


  • /resource
    RequestHeader 어노테이션을 사용하여 header로 전송하는 Authorization 값을 핸들링합니다.
    TokenService 의 메서드를 호출하여 토큰 값을 검증하고 검증이 정상 처리될 경우
    정상 응답 값을 세팅하여 리턴합니다.

10. Token Service, Token Service Impl

Token 서비스 레이어 입니다.

package com.codejcd.service;

public interface TokenService {
	
	/**
	 * token 검증
	 * @param accessToken
	 * @return
	 * @throws Exception
	 */
	public boolean checkAccessToken(String accessToken) throws Exception;
}
package com.codejcd.service;

import java.util.Date;
import javax.xml.bind.DatatypeConverter;
import org.apache.tomcat.util.codec.binary.Base64;
import org.springframework.beans.factory.annotation.Value;
import org.springframework.context.annotation.PropertySource;
import org.springframework.stereotype.Service;
import com.codejcd.common.CustomException;
import com.codejcd.common.MessageProperties;
import com.codejcd.util.DateUtil;
import io.jsonwebtoken.Claims;
import io.jsonwebtoken.Jwts;

@Service
@PropertySource("classpath:jwt.properties")
public class TokenServiceImpl implements TokenService {
	
	@Value("${jwt.secretKey}")
	private String SECRET_KEY;
	
	@Value("${jwt.issuer}")
	private String ISSUER;
	
	@Value("${jwt.audience}")
	private String AUDIENCE;
	
	@Value("${jwt.subject}")
	private String SUBJECT;
	
	@Override
	public boolean checkAccessToken(String accessToken) throws Exception {
		if (null == accessToken || "".equals(accessToken)) {
			throw new CustomException(MessageProperties.prop("error.code.token.invalid")
					, MessageProperties.prop("error.message.token.invalid"));
		}
		
		String[] bearerToken = accessToken.split("Bearer "); 
		if (null == bearerToken[1]) {
			throw new CustomException(MessageProperties.prop("error.code.token.not.bearer")
					, MessageProperties.prop("error.message.token.not.bearer"));
		}
		
		boolean result = false;
		byte[] secretKeyBytes = DatatypeConverter.parseBase64Binary(Base64.encodeBase64String(SECRET_KEY.getBytes()));
		Claims claims = null;
		claims = Jwts.parser()
					.setSigningKey(secretKeyBytes)
					.parseClaimsJws(bearerToken[1]).getBody();
		
		Date expitration;
		Date now = DateUtil.getNowDate();
		String issuer;
		String audience;
		
		
		if (null == claims.getExpiration()) {
			throw new CustomException(MessageProperties.prop("error.code.token.expiration.invalid")
					, MessageProperties.prop("error.message.token.expiration.invalid"));	
		}
		expitration = claims.getExpiration();
		 
		if (DateUtil.isBefore(expitration, now)) {
			throw new CustomException(MessageProperties.prop("error.code.token.expiration")
					, MessageProperties.prop("error.message.token.expiration"));
		}
		
		if (null == claims.getIssuer() ||  "".equals(claims.getIssuer())) {
			throw new CustomException(MessageProperties.prop("error.code.token.issuer.invalid")
					, MessageProperties.prop("error.message.token.issuer.invalid"));		
		}
		issuer = claims.getIssuer();
		
		if (!ISSUER.equals(issuer)) {
			throw new CustomException(MessageProperties.prop("error.code.token.issuer.invalid")
					, MessageProperties.prop("error.message.token.issuer.invalid"));
		}
		
		if (null == claims.getAudience() ||  "".equals(claims.getAudience())) {
			throw new CustomException(MessageProperties.prop("error.code.token.audience.invalid")
					, MessageProperties.prop("error.message.token.audience.invalid"));		
		}
		audience = claims.getAudience();
		
		if (!AUDIENCE.equals(audience)) {
			throw new CustomException(MessageProperties.prop("error.code.token.audience.invalid")
					, MessageProperties.prop("error.message.token.audience.invalid"));
		}
		
		if (null == claims.getId() ||  "".equals(claims.getId())) {
			throw new CustomException(MessageProperties.prop("error.code.token.id.invalid")
					, MessageProperties.prop("error.message.token.id.invalid"));		
		}
		result = true;
		//claims.getIssuedAt();
		//claims.getSubject();
		
		return result;
	}
	
}


  • checkAccessToken 메서드
    Bearere Token에 대한 null, type 등 기본적인 유효성 체크 이후에
    jwt.properties에 미리 정의해둔 secret key를 통해 디코딩하여 Claims 객체를 만듭니다.
    Claims에 정의된 메서드를 통해 속성에 접근하여 토큰의 유효성을 체크하고 결과를 리턴합니다.

11. 테스트

테스트 툴로는 POSTMAN을 사용했습니다.
이전 글에 미리 만든 Authorization 서버를 스타트하고 Resource 서버도 스타트합니다.


http://localhost:8095/oauth2/tokens API를 저번 글에서

미리 생성해둔 Client 정보와 User 정보를 세팅하고 호출하여 토큰 값을 얻습니다.

http://localhost:8096/resource API의 header에 발급받은 Bearer Token Type에 Access Token을 세팅하고 

호출하면 정상적으로 접근하는 것을 확인할 수 있다.


12. 마치며

1부 - Oauth 2.0과 JWT 개념 

2부~3부 - Spring Security Oauth Passsword Credential Demo 구현

4~5부 - Spring Boot Oauth Passsword Credential Demo 구현


1~5부에 걸쳐서 Oauth 개념과 인증과 리소스 서버 데모를 간단하게 구현해봤습니다.

기본 흐름이 어떻게 흘러가는지는 이해하셨을 거라 생각됩니다.

1부에서 개념을 소개하면서 직접 실무에서 사용을 했다고 했는데요.

사용하면서 느낀 점을 한번 적어보겠습니다.

데모 앱에서는 HTTP 프로토콜을 사용하고 따라서

토큰의 경우 클라이언트가 접근 가능한 환경이면 비교적 쉽게 탈취 가능합니다.

base64 encoding 외에 별다른 보안 장치가 없기 때문에

토큰에 중요한 값을 실어 보낸다면 탈취 시 문제가 될 수도 있습니다.

따라서 실제 상용 환경이라면 통신 구간 암호화를 위해 HTTPS 프로토콜을 당연히 사용해야 합니다.

Access Token은 만료 주기를 짧게 해서 탈취에 대한 대비를 어느 정도 할 수도 있습니다.

다만 주기가 짧아지는 만큼 빈번하게 토큰을 발급해야 합니다.

Refresh Token을 탈취당할 것을 대비하여 DB에 저장하고 어느 정도 제어를 할 수 있는

방법은 있지만 Refresh Token을 계속 저장하고 관리해야 하는 부담이 있습니다.

서비스가 커질수록 부담은 늘어납니다.

보안이 엄격하게 유지되어야 하는 서비스에서는 클라이언트에 저장되는 부분이라던지

토큰 탈취에 대한 신경을 많이 쏟아야 하는 구조입니다.

물론 Cookie나 Session을 사용한다고 해서 탈취 위험이 전혀 없는 것은 아닙니다.

비즈니스 상황에 가장 적합하게 분석하여 적용해야 한다고 봅니다.


이번에는 Spring Security Oauth을 사용하지 않고 password credential 방식을 직접 구현해보겠습니다.

DB는 user 테이블은 스키마는 그대로 사용하겠습니다.

삭제하고 다시 만들어도 상관없습니다.

그 외에 oauth_client, oauth_refresh_token 라는 테이블을 각각 생성하고
client, refresh token 데이터를 다루는 용도 사용하겠습니다.

각 테이블 생성 SQL은 Gihub 소스의 src/main/resources/db/scheme.sql 파일을 참고해주세요.


※ 개발 환경 : STS 4.8.1, JDK 1.8, Spring Boot 2.1.6, Mybatis 2.1, MySQL Community 5.6, Maven 4.0.0


1. Authorization Server 구현을 위한 Spring Boot 프로젝트 생성 및 의존성 설정

프로젝트, 패키지 명은 적절하게 선택하여 Spring Stater Project 생성합니다.

의존성 설정은 아래의 pom.xml 파일을 참고해주세요.

<?xml version="1.0" encoding="UTF-8"?>
<project xmlns="http://maven.apache.org/POM/4.0.0" xmlns:xsi="http://www.w3.org/2001/XMLSchema-instance"
	xsi:schemaLocation="http://maven.apache.org/POM/4.0.0 http://maven.apache.org/xsd/maven-4.0.0.xsd">
	<modelVersion>4.0.0</modelVersion>
	<parent>
		<groupId>org.springframework.boot</groupId>
		<artifactId>spring-boot-starter-parent</artifactId>
		<version>2.1.6.RELEASE</version>
		<relativePath/> <!-- lookup parent from repository -->
	</parent>
	<groupId>com.codejcd</groupId>
	<artifactId>SpringbootMybatisMysqlOauth2.0-AuthServer2</artifactId>
	<version>0.0.1-SNAPSHOT</version>
	<name>SpringbootMybatisMysqlOauth2.0-AuthServer2</name>
	<description>SpringbootMybatisMysqlOauth2.0-AuthServer2</description>

	<properties>
		<java.version>1.8</java.version>
	</properties>

	<dependencies>
		<dependency>
			<groupId>org.springframework.boot</groupId>
			<artifactId>spring-boot-starter-web</artifactId>
		</dependency>
		<dependency>
			<groupId>org.mybatis.spring.boot</groupId>
			<artifactId>mybatis-spring-boot-starter</artifactId>
			<version>2.1.0</version>
		</dependency>
		<!-- https://mvnrepository.com/artifact/org.springframework.security/spring-security-crypto -->
		<dependency>
    		<groupId>org.springframework.security</groupId>
    		<artifactId>spring-security-crypto</artifactId>
    		<version>5.1.5.RELEASE</version><!--$NO-MVN-MAN-VER$-->
		</dependency>
		<dependency>
			<groupId>mysql</groupId>
			<artifactId>mysql-connector-java</artifactId>
			<scope>runtime</scope>
		</dependency>
		<dependency>
			<groupId>org.springframework.boot</groupId>
			<artifactId>spring-boot-starter-test</artifactId>
			<scope>test</scope>
		</dependency>
		<dependency>
    		<groupId>io.jsonwebtoken</groupId>
    		<artifactId>jjwt</artifactId>
    		<version>0.9.1</version>
		</dependency>
		<dependency>
			<groupId>javax.xml.bind</groupId>
			<artifactId>jaxb-api</artifactId>
		</dependency>
	</dependencies>

	<build>
		<plugins>
			<plugin>
				<groupId>org.springframework.boot</groupId>
				<artifactId>spring-boot-maven-plugin</artifactId>
			</plugin>
		</plugins>
	</build>

</project>
  • spring-security-crypto
    PasswordEncoder 구현에 사용됩니다.

  • jjwt
    JWT 구현에 사용됩니다.

2. Authorization Server 프로젝트 구조

아래 이미지와 같은 구조를 가지게 됩니다.

- com.codjecd.common : Custom Exception 등 Custom 패키지, MessageProperties 등 공통 컴포넌트 패키지

- com.codejcd.config : 각종 설정 파일들의 패키지

- com.codejcd.dao : DB 액세스를 파일들을 위한 패키지

- com.codejcd.entity : 엔티티를 파일들을 위한 패키지

- com.codejcd.service : 서비스 레이어 패키지

- com.codejcd.controller : 컨트롤러 레이어 패키지

- com.codejcd.util : 유틸 파일 패키지


3. Mybatis 설정

MybatisConfiguration 클래스를 생성하고 Properties에서 읽어올 설정 값과

SQL Session과 Mapper 설정을 합니다.

package com.codejcd.config;

import javax.sql.DataSource;
import org.apache.ibatis.session.SqlSessionFactory;
import org.mybatis.spring.SqlSessionFactoryBean;
import org.mybatis.spring.SqlSessionTemplate;
import org.mybatis.spring.annotation.MapperScan;
import org.springframework.beans.factory.annotation.Qualifier;
import org.springframework.boot.context.properties.ConfigurationProperties;
import org.springframework.context.ApplicationContext;
import org.springframework.context.annotation.Bean;
import org.springframework.context.annotation.Configuration;
import org.springframework.core.io.support.PathMatchingResourcePatternResolver;
import com.zaxxer.hikari.HikariDataSource;

@Configuration
@MapperScan(basePackages = "com.codejcd.*.dao.**", sqlSessionFactoryRef = "sqlSessionFactory")
public class MybatisConfiguration {

	@Bean(name = "dataSource")
	@ConfigurationProperties(prefix = "spring.datasource.hikari")
	public DataSource dataSource() {
		return new HikariDataSource();
	}
	
	@Bean(name = "sqlSessionFactory")
	public SqlSessionFactory sqlSessionFactory (
			@Qualifier("dataSource") DataSource dataSource,
			ApplicationContext applicationContext) throws Exception {
		
			SqlSessionFactoryBean sqlSessionFactory = new SqlSessionFactoryBean();
			sqlSessionFactory.setDataSource(dataSource);
			sqlSessionFactory.setMapperLocations(new PathMatchingResourcePatternResolver().getResources("mybatis/mapper/*.xml"));
			
		return sqlSessionFactory.getObject(); 
	}
	
	@Bean(name = "sqlSession")
	public SqlSessionTemplate sqlSession(SqlSessionFactory sqlSessionFactory) throws Exception {
		return new SqlSessionTemplate(sqlSessionFactory);
	}
	
}


4. Message Source 설정

Exception 등 서버에서 처리할 메시지를 정의하고 맵핑하는 설정.
/src/main/resources/messages/ message.*.properties 파일들과 맵핑됩니다.

Locale을 KOREA로 설정했기떄문에 message.ko.properties 가 기본 메시지 프로퍼티로 사용됩니다.


4.1 Message Source Configuration

package com.codejcd.config;

import java.util.Locale;
import org.springframework.context.MessageSource;
import org.springframework.context.annotation.Bean;
import org.springframework.context.annotation.Configuration;
import org.springframework.context.support.ReloadableResourceBundleMessageSource;

@Configuration
public class MessageSourceConfiguration {

	@Bean
	public MessageSource messageSource() {
		ReloadableResourceBundleMessageSource source = new ReloadableResourceBundleMessageSource();
	    source.setBasename("classpath:/messages/message"); // 메시지 파일 위치
	    source.setDefaultEncoding("UTF-8");
	    source.setCacheSeconds(10);
	    source.setUseCodeAsDefaultMessage(true);
	    Locale.setDefault(Locale.KOREA); // 기본 Locale
	   
	    return source;
	}
}


4.2 Message Source Properties

src/main/resources/messages 폴더를 생성하고
message_ko.properties 파일을 생성합니다.

code와 message 값을 정의합니다.
프로젝트의 크기에 따라 code 의 범위는 적절하게 조절하세요.
여기서는 데모 앱이므로 범위가 작습니다.

error.code.common.success=000
error.message.common.success=Process Success

error.code.common.occured.exception=999
error.message.common.occured.exception=Process Fail

error.code.userId.invalid=000
error.message.userId.invalid=User ID is invalid

error.code.userPassword.invalid=001
error.message.userPassword.invalid=User Password is invalid

error.code.token.invalid=010
error.message.token.invalid=token is invalid

error.code.token.expiration.invalid=011
error.message.token.expiration.invalid=token expiration is invalid

error.code.token.expiration=012
error.message.token.expiration=token is expired

error.code.token.issuer.invalid=013
error.message.token.issuer.invalid=issuer is invalid

error.code.token.audience.invalid=014
error.message.token.audience.invalid=audience is invalid

error.code.token.id.invalid=015
error.message.token.id.invalid=token ID is invalid

error.code.authorization.invalid=020
error.message.authorization.invalid=authorization is invalid

error.code.client.secretkey.invalid=030
error.message.client.secretkey.invalid=client secret key is invalid


5. application.properties

MySQL DB에 접근하기 위한 설정을 추가합니다.

테스트 설정이니 참고만 해주시고 절대로 상용에서 사용하면 안 되는 비밀번호입니다.

server.port=8095
spring.datasource.hikari.driver-class-name=com.mysql.cj.jdbc.Driver
spring.datasource.hikari.jdbc-url=jdbc:mysql://localhost:3306/oauth2?characterEncoding=UTF-8&serverTimezone=Asia/Seoul
spring.datasource.hikari.username=root
spring.datasource.hikari.password=1234
spring.datasource.hikari.maximum-pool-size=10
spring.datasource.hikari.connection-test-query=SELECT 1 FROM DUAL
spring.datasource.hikari.minimum-idle=5
spring.datasource.hikari.connection-timeout=100000


6. jwt.properties 

JWT 설정 값들을 관리하는 파일입니다.

JWT Access Token 과 Refresh Token 생성에 필요한 값들.


7. Custom Exception 

Custom Exception을 처리하기 위한 클래스입니다.

Exception 클래스를 상속 받고 error code, message, description을 처리하기 위한 멤버 변수를 가집니다.

package com.codejcd.common;

public class CustomException extends Exception {
	private static final long serialVersionUID = -3642478745758696786L;
	private String errorCode;
	private String errorMessage;
	private String errorDescription;
	
	public CustomException() {
	
	}
	
	public CustomException(String errorCode, String errorMessage) {
		this.errorCode = errorCode;
		this.errorMessage = errorMessage;
	}
	
	public CustomException(String errorCode, String errorMessage, String errorDescription) {
		this.errorCode = errorCode;
		this.errorMessage = errorMessage;
		this.errorDescription = errorDescription;
	}
	
	public String getErrorCode() {
		return errorCode;
	}
	public void setErrorCode(String errorCode) {
		this.errorCode = errorCode;
	}
	public String getErrorMessage() {
		return errorMessage;
	}
	public void setErrorMessage(String errorMessage) {
		this.errorMessage = errorMessage;
	}
	public String getErrorDescription() {
		return errorDescription;
	}
	public void setErrorDescription(String errorDescription) {
		this.errorDescription = errorDescription;
	}
}


8. Custom Password Encoder 

Bcrypt 인코딩 방식을 사용하는  Password Encoder 구현.
Commponet 어노테이션을 사용하여 빈으로 등록한다.

package com.codejcd.common;

import org.springframework.security.crypto.bcrypt.BCryptPasswordEncoder;
import org.springframework.security.crypto.password.PasswordEncoder;
import org.springframework.stereotype.Component;

/**
 * BCrypt Passwodencoder Component
 * BCrypt 의존성이 주입된 passwordencoder
 */
@Component
public class CustomPasswordEncoder implements PasswordEncoder {
	private PasswordEncoder passwordEncoder;
	
	public CustomPasswordEncoder() {
		this.passwordEncoder = new BCryptPasswordEncoder();
	}
	
	@Override
	public String encode(CharSequence rawPassword) {
		return passwordEncoder.encode(rawPassword);
	}
	
	@Override
	public boolean matches(CharSequence rawPassword, String encodedPassword) {
		return passwordEncoder.matches(rawPassword, encodedPassword);
	}
	

}


9. Custom Response 

응답을 위한 Response 객체를 구현.

응답 코드(responseCode), 응답 메시지(responseMessage), 응답 결과 객체(result)를 멤버변수로 가진다.

package com.codejcd.common;

/**
 * 커스터마이징 응답 객체
 */
public class Response {

	private String responseCode;
	private String responseMessage;
	private Object result;
	public String getResponseCode() {
		return responseCode;
	}
	public void setResponseCode(String responseCode) {
		this.responseCode = responseCode;
	}
	public String getResponseMessage() {
		return responseMessage;
	}
	public void setResponseMessage(String responseMessage) {
		this.responseMessage = responseMessage;
	}
	public Object getResult() {
		return result;
	}
	public void setResult(Object result) {
		this.result = result;
	}
}


10. Date Utill 

날짜, 시간 계산을 편하게 하기 위한 유틸 클래스.

package com.codejcd.util;

import java.text.ParsePosition;
import java.text.SimpleDateFormat;
import java.util.Calendar;
import java.util.Date;

/**
 * Date Util
 *
 */
public class DateUtil {

	public static final String YYYYMMDDHHmm = "yyyyMMddHHmm";
	
    public static Date getDate(String dateString, String format) throws Exception{
    	SimpleDateFormat formatter = new SimpleDateFormat(format);
    	ParsePosition pos = new ParsePosition(0);
    	return formatter.parse(dateString, pos);
    }
	
	public static String getNow(String fromFormat) {
		Calendar cal = Calendar.getInstance();
		Date today = cal.getTime();
		SimpleDateFormat formatter = new SimpleDateFormat(fromFormat);
		return formatter.format(today);
	}
	
	public static Date getNowDate() {
		Calendar cal = Calendar.getInstance();
		return cal.getTime();
	}
	
    public static String addMinute(String dateString, String format, int minute){
    	Calendar cal = Calendar.getInstance();
    	SimpleDateFormat formatter = new SimpleDateFormat(format);
        ParsePosition pos = new ParsePosition(0);
        cal.setTime(formatter.parse(dateString, pos));
        cal.add(Calendar.MINUTE,minute);

		return formatter.format(cal.getTime());
    }
	
    public static String addHour(String dateString, String format, int hours){
    	Calendar cal = Calendar.getInstance();
    	SimpleDateFormat formatter = new SimpleDateFormat(format);
        ParsePosition pos = new ParsePosition(0);
        cal.setTime(formatter.parse(dateString, pos));
        cal.add(Calendar.HOUR,hours);

		return formatter.format(cal.getTime());
    }
	
    public static String addDate(String dateString, String format, int days){
    	Calendar cal = Calendar.getInstance();
    	SimpleDateFormat formatter = new SimpleDateFormat(format);
        ParsePosition pos = new ParsePosition(0);
        cal.setTime(formatter.parse(dateString, pos));
        cal.add(Calendar.DATE,days);

		return formatter.format(cal.getTime());
    }
    
    public static boolean isBefore(Date from, Date to) {
		if (from == null || to == null) {
			return false;
		}
		if (to.before(from)) {
			return false;
		}
		return true;
	}

}


  • getDate 메서드
    String 날짜 값, 포맷 값을 매개변수로 받아서
    날짜를 Date로 반환.

  • getNow 메서드
    String 포맷 값을 매개변수로 받아서
    오늘 날짜를 String로 반환.

  • getNowDate 메서드
    매개변수 없이 오늘 날짜를 Date로 반환.

  • addMinute 메서드
    String 날짜 값, 포맷, 추가할 시간(Minute)을 매개변수로 받아서
    연산하고 날짜 값을 String으로 반환. 

  • addHour 메서드
    String 날짜 값, 포맷, 추가할 시간(Hour)을 매개변수로 받아서
    연산하고 날짜 값을 String으로 반환.

  • addDate 메서드
    String 날짜 값, 포맷, 추가할 시간(days)을 매개변수로 받아서
    연산하고 날짜 값을 String으로 반환.

  • isBefore 메서드
    Date 비교할 두 날짜 값을 매개변수로 받아서
    비교하고 이전 날짜 여부를 판단한 값을 boolean 으로 반환.

11. Client, Token, RefreshToken, User Entity 구현

Client, Token, RefreshToken, User 객체를 생성합니다.

RefreshToken은 Token을 상속받습니다.

멤버변수와 getter/setter에 대한 내용이므로 소스를 확인해주시고

설명은 생략하겠습니다.

package com.codejcd.entity;

public class Client {
	private int clientSeq;
	private String clientId;
	private String clientSecret;
	private String status;
	private String regDate;
	
	public String getClientId() {
		return clientId;
	}
	public void setClientId(String clientId) {
		this.clientId = clientId;
	}
	public String getClientSecret() {
		return clientSecret;
	}
	public void setClientSecret(String clientSecret) {
		this.clientSecret = clientSecret;
	}
	public int getClientSeq() {
		return clientSeq;
	}
	public void setClientSeq(int clientSeq) {
		this.clientSeq = clientSeq;
	}
	public String getStatus() {
		return status;
	}
	public void setStatus(String status) {
		this.status = status;
	}
	public String getRegDate() {
		return regDate;
	}
	public void setRegDate(String regDate) {
		this.regDate = regDate;
	}
	
	
}
package com.codejcd.entity;

public class Token {
	private String token;
	public String getToken() {
		return token;
	}
	public void setToken(String token) {
		this.token = token;
	}
}
package com.codejcd.entity;

public class RefreshToken extends Token {

	private int tokenId;
	private int refreshTokenSeq;
	private String authentication;
	
	public int getRefreshTokenSeq() {
		return refreshTokenSeq;
	}
	public void setRefreshTokenSeq(int refreshTokenSeq) {
		this.refreshTokenSeq = refreshTokenSeq;
	}
	public String getAuthentication() {
		return authentication;
	}
	public void setAuthentication(String authentication) {
		this.authentication = authentication;
	}
	public int getTokenId() {
		return tokenId;
	}
	public void setTokenId(int tokenId) {
		this.tokenId = tokenId;
	}


}
package com.codejcd.entity;

public class User  {
	private int userSeq;
	private String userId;
	private String password;
	private String name;
	private String status;

	public int getUserSeq() {
		return userSeq;
	}

	public void setUserSeq(int userSeq) {
		this.userSeq = userSeq;
	}

	public String getUserId() {
		return userId;
	}

	public void setUserId(String userId) {
		this.userId = userId;
	}

	public String getPassword() {
		return password;
	}

	public void setPassword(String password) {
		this.password = password;
	}

	public String getName() {
		return name;
	}

	public void setName(String name) {
		this.name = name;
	}

	public String getStatus() {
		return status;
	}

	public void setStatus(String status) {
		this.status = status;
	}

}


12. Client, Refresh Token , User Mapper 구현

12.1 Client Mapper

oauth_client 테이블에 접근하여 SQL 을 사용하여 조회하는 Mapper입니다.

<?xml version="1.0" encoding="UTF-8"?>
<!DOCTYPE mapper PUBLIC "-//mybatis.org//DTD Mapper 3.0//EN"
        "http://mybatis.org/dtd/mybatis-3-mapper.dtd">
<mapper namespace="com.codejcd.mapper.ClientMapper">
	<sql id="table_name">
		oauth_client
	</sql>

	<select id="selectClientByClientId" parameterType="com.codejcd.entity.Client" resultType="com.codejcd.entity.Client" >
		SELECT client_seq as clientSeq
			, client_id as clientId
			, client_secret as clientSecret
  			, status as status
  			, reg_date as regDate
  		 FROM <include refid="table_name" />
  		WHERE client_id = #{clientId}  	 	 
	</select>
	
	<insert id="registClient" parameterType="com.codejcd.entity.Client" keyProperty="clientSeq" useGeneratedKeys="true" >
		INSERT INTO <include refid="table_name" />
		(
			client_seq
			, client_id 
			, client_secret 
  			, status 
  			, reg_date 
		) VALUES
		(
			#{clientSeq}
			, #{clientId}
			, #{clientSecret}
			, 'A'
			, now()
		)
	</insert>
</mapper>


  • selectClientByClientId
    oauth_client 테이블을 client_id 칼럼을 WHERE 조건문으로 조회하는 SQL입니다.

  • registClient
    oauth_client 테이블에 cleint 정보를 등록하는 SQL입니다.

12.2 Refresh Token Mapper

oauth_refresh_token 테이블에 접근하여 SQL을 사용하여 조회하는 Mapper입니다.

이전 글에서 구현 시에는 refresh_token을 저장하지는 않았는데요.

보통 Access Token은 만료 주기를 짧게 설정하고 Refresh Token 만료 주기를 길게 설정합니다.

이럴 경우 Refresh Token이 탈취당할 경우 계속 Access Token을 발급받을 수 있기 때문에

 Refresh Token을 비교하여 수정/삭제 같은 조치를 하여 접근 제어를 하는 방안이 있습니다.

<?xml version="1.0" encoding="UTF-8"?>
<!DOCTYPE mapper PUBLIC "-//mybatis.org//DTD Mapper 3.0//EN"
        "http://mybatis.org/dtd/mybatis-3-mapper.dtd">
<mapper namespace="com.codejcd.mapper.RefreshTokenMapper">
	<select id="countRefreshTokenByToken" parameterType="com.codejcd.entity.RefreshToken" resultType="int" >
		SELECT COUNT(token_id) 
  		  FROM oauth_refresh_token
  		 WHERE token = #{token}  	 
	</select>
	<select id="selectRefreshTokenByAuthentication" parameterType="com.codejcd.entity.RefreshToken"  resultType="com.codejcd.entity.RefreshToken">
		SELECT token_id AS tokenId
 				, token AS token
				, authentication AS authentication
  		 FROM oauth_refresh_token
  		WHERE authentication = #{authentication} 
  	</select> 
	<insert id="insertRefreshToken" parameterType="com.codejcd.entity.RefreshToken" keyProperty="tokenId" useGeneratedKeys="true" >
		INSERT INTO oauth_refresh_token
		(
			token_id
 			, token
			, authentication
		) VALUES
		(
			#{tokenId}
			, #{token}
			, #{authentication}
		)
	</insert>
	<delete id="deleteRefreshTokenByAuthentication" parameterType="com.codejcd.entity.RefreshToken">
		DELETE 
		  FROM oauth_refresh_token
		 WHERE authentication = #{authentication}
	</delete>
	<update id="updateRefreshTokenByAuthentication" parameterType="com.codejcd.entity.RefreshToken" >
		UPDATE oauth_refresh_token SET
 			   token = #{token}
 		 WHERE authentication = #{authentication}
	</update>
</mapper>


  • countRefreshTokenByToken
    oauth_refresh_token 테이블에 token 칼럼을
    WHERE 조건문으로 조회하여 결과 값을 카운트하는 SQL입니다.

  • selectRefreshTokenByAuthentication
    oauth_refresh_token 테이블에 token 칼럼을
    WHERE 조건문으로 조회하여 결과 값을 얻는 SQL입니다.

  • insertRefreshToken
    oauth_refresh_token 테이블에 Refresh Token 정보를 등록하는 SQL입니다.

  • deleteRefreshTokenByAuthentication
    oauth_refresh_token 테이블에 authentication 칼럼을
    WHERE 조건문으로 삭제하는 SQL입니다.

  • updateRefreshTokenByAuthentication
    oauth_refresh_token 테이블에 authentication 칼럼을
    WHERE 조건문으로 하여, token 칼럼 값을 업데이트하는 SQL입니다.

12.3 User Mapper

user 테이블에 접근하여 SQL을 사용하여 조회하는 Mapper입니다.

<?xml version="1.0" encoding="UTF-8" ?>
<!DOCTYPE mapper PUBLIC "-//mybatis.org//DTD Mapper 3.0//EN"
        "http://mybatis.org/dtd/mybatis-3-mapper.dtd">
 
<mapper namespace="com.codejcd.mapper.UserMapper">
     <select id="selectUserByUserId" parameterType="String" resultType="com.codejcd.entity.User" >
  		SELECT user_seq as userSeq
  				, user_id as userId
  				, password as password
  				, name as name
  				, status as status
  				, reg_date as regDate
  		  FROM user
  		WHERE user_id = #{userId}  	 
     </select>
     <select id="selectUser" parameterType="com.codejcd.entity.User" resultType="com.codejcd.entity.User">
       	SELECT user_seq as userSeq
  				, user_id as userId
  				, password as password
  				, name as name
  				, status as status
  				, reg_date as regDate
  		  FROM user
  		 WHERE user_id = #{userId}  
  		   AND password = #{password}	
     </select>
     <insert id="registUser" parameterType="com.codejcd.entity.User" keyProperty="userSeq" useGeneratedKeys="true" >
		INSERT INTO user
		(
			user_seq
			, user_id 
			, name
			, password 
  			, status 
  			, reg_date 
		) VALUES
		(
			#{userSeq}
			, #{userId}
			, #{name}
			, #{password}
			, 'A'
			, now()
		)
	</insert>
</mapper>


  • selectUserByUserId
    user 테이블을 user_id 칼럼을 WHERE 조건문으로 조회하여
    결과 값을 얻는 SQL입니다.

  • selectUser
    user 테이블을 user_id 칼럼과 password 칼럼을
    WHERE 조건문으로 조회하여 결과 값을 얻는 SQL입니다.

  • registUser
    user 테이블에 user 정보를 등록하는 SQL입니다.

13. Client, Refresh Token , User DAO 구현

Client, Refresh Token, User SQL Mapper에 접근하여 결과 값을 얻을 DAO를 작성합니다.

Repository 어노테이션을 통해 Bean으로 등록합니다.

package com.codejcd.dao;

import org.mybatis.spring.SqlSessionTemplate;
import org.springframework.beans.factory.annotation.Autowired;
import org.springframework.beans.factory.annotation.Qualifier;
import org.springframework.stereotype.Repository;

import com.codejcd.entity.Client;

@Repository
public class ClientDao {
	private final static String NAMESPACE = "com.codejcd.mapper.ClientMapper.";
	
	@Autowired
	@Qualifier("sqlSession")
	private SqlSessionTemplate sqlSession;
	
	public Client selectClientByClientId(String clientId) {
		Client client = new Client();
		client.setClientId(clientId);
		
		return sqlSession.selectOne(NAMESPACE + "selectClientByClientId", client); 
	}
	
	public int registClient(String clientId, String clientSecret) {
		Client client = new Client();
		client.setClientId(clientId);
		client.setClientSecret(clientSecret);
		
		return sqlSession.insert(NAMESPACE + "registClient", client); 
	}
}
package com.codejcd.dao;

import org.mybatis.spring.SqlSessionTemplate;
import org.springframework.beans.factory.annotation.Autowired;
import org.springframework.beans.factory.annotation.Qualifier;
import org.springframework.stereotype.Repository;

import com.codejcd.entity.RefreshToken;

@Repository
public class RefreshTokenDao {
	private final static String NAMESPACE = "com.codejcd.mapper.RefreshTokenMapper.";
	
	@Autowired
	@Qualifier("sqlSession")
	private SqlSessionTemplate sqlSession;
	
	public int countRefreshToken(RefreshToken refreshToken) {
		return sqlSession.selectOne(NAMESPACE+ "countRefreshTokenByToken", refreshToken);
	}
	
	public RefreshToken selectRefreshToken(RefreshToken refreshToken) {
		return sqlSession.selectOne(NAMESPACE+ "selectRefreshTokenByAuthentication", refreshToken);
	}
	
	public int insertRefreshToken(RefreshToken refreshToken) {
		return sqlSession.insert(NAMESPACE + "insertRefreshToken", refreshToken);
	}
	
	public int deleteRefreshToken(RefreshToken refreshToken) {
		return sqlSession.delete(NAMESPACE+ "deleteRefreshTokenByAuthentication", refreshToken);
	}
	
	public int updateRefreshToken(RefreshToken refreshToken) {
		return sqlSession.delete(NAMESPACE+ "updateRefreshTokenByAuthentication", refreshToken);
	}
}
package com.codejcd.dao;
import org.mybatis.spring.SqlSessionTemplate;
import org.springframework.beans.factory.annotation.Autowired;
import org.springframework.beans.factory.annotation.Qualifier;
import org.springframework.stereotype.Repository;
import com.codejcd.entity.User;

@Repository
public class UserDao {
	private final static String NAMESPACE = "com.codejcd.mapper.UserMapper.";
	
	@Autowired
	@Qualifier("sqlSession")
	private SqlSessionTemplate sqlSession;
	
	   public User selectUserByUserId(String userId) {
	    	return sqlSession.selectOne(NAMESPACE + "selectUserByUserId", userId);
	   }
	   
	   public User selectUser(String userId, String password) {
		   User user = new User();
		   user.setUserId(userId);
		   user.setPassword(password);
		   
		   return sqlSession.selectOne(NAMESPACE + "selectUser", user);
	   }
	   
		public int registUser(String userId, String userName, String password) {
			User user = new User();
			
			user.setUserId(userId);
			user.setName(userName);
			user.setPassword(password);
			
			return sqlSession.insert(NAMESPACE + "registUser", user); 
		}

}


14. Client Service, Token Service, User Service Impl

Serivce 인터페이스와 구현체 클래스로 구성됩니다.

Service 어노테이션으로 Bean 등록을 합니다.

현재는 인터페이스 구현체 관계가 1:1이기 때문에 Service Interface 경우 생략 가능합니다.

OCP 관점보다는 구현을 위한 최초 설계도 역할을 했다고 보면 될 것 같습니다.

1:1 관계에서 인터페이스 구현체 관계는 관습적인 불필요한 관계로 보고 있으니 프로젝트마다

코딩 컨벤션을 잘 정해서 따르면 될 것 같습니다.


14.1 Cllint Service, impl

package com.codejcd.service;

public interface ClientService {
	/**
	 * 클라이언트 조회 및 검증
	 * @param authorization
	 * @return
	 * @throws Exception
	 */
	public void checkClientByClientId(String authorization) throws Exception;
	
	/**
	 * 클라이언트 등록
	 * @param clientId
	 * @param clientSecret
	 * @return
	 * @throws Exception
	 */
	public int registClient(String clientId, String clientSecret) throws Exception; 
}
package com.codejcd.service;

import java.nio.charset.StandardCharsets;
import java.util.Base64;
import org.springframework.beans.factory.annotation.Autowired;
import org.springframework.stereotype.Service;
import com.codejcd.common.CustomException;
import com.codejcd.common.CustomPasswordEncoder;
import com.codejcd.common.MessageProperties;
import com.codejcd.dao.ClientDao;
import com.codejcd.entity.Client;

@Service
public class ClientServiceImpl implements ClientService {

	@Autowired
	private ClientDao clientDao;
	
	@Autowired
	private CustomPasswordEncoder passwordEncoder;
	
	@Override
	public void checkClientByClientId(String authorization) throws Exception {
		
   		String[] client = null;
		if (authorization == null || !authorization.toLowerCase().startsWith("basic")) {
			throw new CustomException(MessageProperties.prop("error.code.authorization.invalid")
					, MessageProperties.prop("error.message.authorization.invalid"));	
		}
		
		// Authorization: Basic base64credentials
	    String base64Credentials = authorization.substring("Basic".length()).trim();
	    byte[] credDecoded = Base64.getDecoder().decode(base64Credentials);
	    String credentials = new String(credDecoded, StandardCharsets.UTF_8);
	    // credentials = username:password
	    client = credentials.split(":", 2);
	    Client resultClient = clientDao.selectClientByClientId(client[0]);
	    if (null == resultClient) {
			throw new CustomException(MessageProperties.prop("error.code.authorization.invalid")
					, MessageProperties.prop("error.message.authorization.invalid"));	
	    }

	    boolean result = passwordEncoder.matches(client[1], resultClient.getClientSecret());
	    
		if (!result) {
			throw new CustomException(MessageProperties.prop("error.code.client.secretkey.invalid")
					, MessageProperties.prop("error.message.client.secretkey.invalid"));	
		}
	}
	
	@Override
	public int registClient(String clientId, String clientSecret) throws Exception {
		clientSecret = passwordEncoder.encode(clientSecret);
		return clientDao.registClient(clientId, clientSecret);
	}
}


  • selectClientByClientId 메서드
    클라이언트 정보를 조회하여 유효한지 검증하고
    유효하지 않은 경우 Exception을 throw 합니다.
    클라이언트 정보는 컨트롤러를 통해 전달되는데
  • API 호출 시 HTTP Header 값에 authorization Basic 세팅하는 값이고
    Base64 Encoding 되어 있기 때문에 이를 Decoding 하여
    저장된 클라이언트 값과 비교하여 유효성을 검증합니다.

  • registClient 메서드
    클라이언트 정보를 매개변수로 받아서
    클라이언트 정보를 저장하는 DAO를 호출합니다.
    client secrert 값은 앞에서 미리 생성한
    password encoder를 사용하여 encoding 합니다.

14.2  Token Service, Impl

package com.codejcd.service;

import java.util.HashMap;

import com.codejcd.common.CustomException;
import com.codejcd.entity.User;

public interface TokenService {
	
	/**
	 * 액세스 및 리프레시 토큰 발행
	 * @param user
	 * @return
	 * @throws Exception
	 */
	public HashMap<String, Object> getTokens(User user) throws Exception;
	
	/**
	 * 액세스 토큰 생성
	 * @param user
	 * @return
	 * @throws Exception
	 */
	public String getAccessToken(User user) throws Exception;
	
	/**
	 * 액세스 토큰 검사
	 * @param accessToken
	 * @return
	 * @throws Exception
	 */
	public boolean checkAccessToken(String accessToken) throws Exception;
	
	/**
	 * 액세스 토큰 재발행
	 * @param accessToken
	 * @return
	 * @throws Exception
	 */
	public String refreshAccessToken(String accessToken) throws Exception;
	
	/**
	 * 리프레시 토큰 생성
	 * @param user
	 * @return
	 * @throws Exception
	 */
	public String getRefreshToken(User user) throws Exception;
	
	/**
	 * 리프레시 토큰 검사
	 * @param accessToken
	 * @return
	 * @throws Exception
	 */
	public User checkRefreshToken(String refreshToken) throws CustomException, Exception;
	
}
package com.codejcd.service;

import java.security.Key;
import java.util.Date;
import java.util.HashMap;

import javax.crypto.spec.SecretKeySpec;
import javax.xml.bind.DatatypeConverter;

import org.apache.tomcat.util.codec.binary.Base64;
import org.springframework.beans.factory.annotation.Autowired;
import org.springframework.beans.factory.annotation.Value;
import org.springframework.context.annotation.PropertySource;
import org.springframework.stereotype.Service;
import org.springframework.transaction.annotation.Transactional;

import com.codejcd.common.CustomException;
import com.codejcd.common.MessageProperties;
import com.codejcd.dao.RefreshTokenDao;
import com.codejcd.entity.RefreshToken;
import com.codejcd.entity.User;
import com.codejcd.util.DateUtil;

import io.jsonwebtoken.Claims;
import io.jsonwebtoken.JwtBuilder;
import io.jsonwebtoken.Jwts;
import io.jsonwebtoken.SignatureAlgorithm;

@Service
@PropertySource("classpath:jwt.properties")
public class TokenServiceImpl implements TokenService {
	
	@Value("${jwt.accessToken.secretKey}")
	private String ACCESS_TOKEN_SECRET_KEY;
	
	@Value("${jwt.accessToken.expireHour}")
	private String ACCESS_TOKEN_EXPIRE_DAY;
	
	@Value("${jwt.accessToken.issuer}")
	private String ACCESS_TOKEN_ISSUER;
	
	@Value("${jwt.accessToken.audience}")
	private String ACCESS_TOKEN_AUDIENCE;
	
	@Value("${jwt.accessToken.subject}")
	private String ACCESS_TOKEN_SUBJECT;
	
	@Value("${jwt.refreshToken.secretKey}")
	private String REFRESH_TOKEN_SECRET_KEY;
	
	@Value("${jwt.refreshToken.expireDay}")
	private String REFRESH_TOKEN_EXPIRE_DAY;
	
	@Value("${jwt.refreshToken.issuer}")
	private String REFRESH_TOKEN_ISSUER;
	
	@Value("${jwt.refreshToken.audience}")
	private String REFRESH_TOKEN_AUDIENCE;
	
	@Value("${jwt.refreshToken.subject}")
	private String REFRESH_TOKEN_SUBJECT;
	
	@Autowired
	private UserService userService;
	
	@Autowired
	private RefreshTokenDao refreshTokenDao;
	
	@Override
	@Transactional(rollbackFor = {Exception.class})
	public HashMap<String, Object> getTokens(User user) throws Exception {
		String accessToken = getAccessToken(user);
		String refreshToken = getRefreshToken(user);
		HashMap<String, Object> resultMap = new HashMap<String, Object>();
		resultMap.put("accessToken", accessToken);
		resultMap.put("refreshToken", refreshToken);
		return resultMap;
	}
	
	@Override
	public String getAccessToken(User user) throws Exception {
		if (null == user) {
			throw new CustomException(MessageProperties.prop("error.code.userId.invalid")
					, MessageProperties.prop("error.message.userId.invalid"));
		}
		
        SignatureAlgorithm signatureAlgorithm = SignatureAlgorithm.HS256;
		byte[] secretKeyBytes = DatatypeConverter.parseBase64Binary(Base64.encodeBase64String(ACCESS_TOKEN_SECRET_KEY.getBytes()));
		Key signKey = new SecretKeySpec(secretKeyBytes, signatureAlgorithm.getJcaName());
		
		//String strExpiration = DateUtil.addHour(DateUtil.getNow(DateUtil.YYYYMMDDHHmm), DateUtil.YYYYMMDDHHmm, Integer.parseInt(ACCESS_TOKEN_EXPIRE_DAY));
		String strExpiration = DateUtil.addMinute(DateUtil.getNow(DateUtil.YYYYMMDDHHmm), DateUtil.YYYYMMDDHHmm, 1);
		
		Date expiration = DateUtil.getDate(strExpiration, DateUtil.YYYYMMDDHHmm);
		//System.out.println("strExp : " + expiration);
		String userId = user.getUserId();
		
		if (null == userId && "".equals(userId)) {
			throw new CustomException(MessageProperties.prop("error.code.userId.invalid")
					, MessageProperties.prop("error.message.userId.invalid"));	
		}
		
	    JwtBuilder jwtBuilder = Jwts.builder()
	                .setId(userId) //jti(고유식별자)
	                .setAudience(ACCESS_TOKEN_AUDIENCE) // 토큰 대상자
	                .setIssuedAt(DateUtil.getNowDate()) //iat 발행날짜
	                .setSubject(ACCESS_TOKEN_SUBJECT) //sub 제목 
	                .setIssuer(ACCESS_TOKEN_ISSUER) // iss 발급자
	                .setExpiration(expiration) // exp 만료날짜
	                .signWith(signatureAlgorithm, signKey); // sign algo, key
		String temp =jwtBuilder.compact();
	    
	    checkAccessToken(temp);
	    
		return temp;
	}

	@Override
	public boolean checkAccessToken(String accessToken) throws Exception {
		if (null == accessToken || "".equals(accessToken)) {
			throw new CustomException(MessageProperties.prop("error.code.token.invalid")
					, MessageProperties.prop("error.message.token.invalid"));
		}
		
		boolean result = false;
		byte[] secretKeyBytes = DatatypeConverter.parseBase64Binary(Base64.encodeBase64String(ACCESS_TOKEN_SECRET_KEY.getBytes()));
		Claims claims = null;
		claims = Jwts.parser()
					.setSigningKey(secretKeyBytes)
					.parseClaimsJws(accessToken).getBody();
		
		Date expitration;
		Date now = DateUtil.getNowDate();
		String id;
		String issuer;
		String audience;
		
		
		if (null == claims.getExpiration()) {
			throw new CustomException(MessageProperties.prop("error.code.token.expiration.invalid")
					, MessageProperties.prop("error.message.token.expiration.invalid"));	
		}
		expitration = claims.getExpiration();
		System.out.println(expitration);
		 
		if (DateUtil.isBefore(expitration, now)) {
			throw new CustomException(MessageProperties.prop("error.code.token.expiration")
					, MessageProperties.prop("error.message.token.expiration"));
		}
		
		if (null == claims.getIssuer() ||  "".equals(claims.getIssuer())) {
			throw new CustomException(MessageProperties.prop("error.code.token.issuer.invalid")
					, MessageProperties.prop("error.message.token.issuer.invalid"));		
		}
		issuer = claims.getIssuer();
		
		if (!ACCESS_TOKEN_ISSUER.equals(issuer)) {
			throw new CustomException(MessageProperties.prop("error.code.token.issuer.invalid")
					, MessageProperties.prop("error.message.token.issuer.invalid"));
		}
		
		if (null == claims.getAudience() ||  "".equals(claims.getAudience())) {
			throw new CustomException(MessageProperties.prop("error.code.token.audience.invalid")
					, MessageProperties.prop("error.message.token.audience.invalid"));		
		}
		audience = claims.getAudience();
		
		if (!ACCESS_TOKEN_AUDIENCE.equals(audience)) {
			throw new CustomException(MessageProperties.prop("error.code.token.audience.invalid")
					, MessageProperties.prop("error.message.token.audience.invalid"));
		}
		
		if (null == claims.getId() ||  "".equals(claims.getId())) {
			throw new CustomException(MessageProperties.prop("error.code.token.id.invalid")
					, MessageProperties.prop("error.message.token.id.invalid"));		
		}
		id = claims.getId();	
		User user = userService.selectUserByUserId(id);
		
		if (null == user) {
			throw new CustomException(MessageProperties.prop("error.code.token.id.invalid")
					, MessageProperties.prop("error.message.token.id.invalid"));
		}
		result = true;
		//claims.getIssuedAt();
		//claims.getSubject();
		
		return result;
	}
	
	
	@Override
	public String refreshAccessToken(String refreshToken) throws Exception {
		User user = checkRefreshToken(refreshToken); 
		return getAccessToken(user);
	}
	
	@Override
	public String getRefreshToken(User user) throws Exception {
		if (null == user) {
			throw new CustomException(MessageProperties.prop("error.code.userId.invalid")
					, MessageProperties.prop("error.message.userId.invalid"));
		}
		
        SignatureAlgorithm signatureAlgorithm = SignatureAlgorithm.HS256;
		byte[] secretKeyBytes = DatatypeConverter.parseBase64Binary(Base64.encodeBase64String(REFRESH_TOKEN_SECRET_KEY.getBytes()));
		Key signKey = new SecretKeySpec(secretKeyBytes, signatureAlgorithm.getJcaName());
		
		String strExpiration = DateUtil.addDate(DateUtil.getNow(DateUtil.YYYYMMDDHHmm), DateUtil.YYYYMMDDHHmm, Integer.parseInt(REFRESH_TOKEN_EXPIRE_DAY));
		Date expiration = DateUtil.getDate(strExpiration, DateUtil.YYYYMMDDHHmm);
		
		String userId = user.getUserId();
		
		if (null == userId && "".equals(userId)) {
			throw new CustomException(MessageProperties.prop("error.code.userId.invalid")
					, MessageProperties.prop("error.message.userId.invalid"));	
		}
		
	    JwtBuilder jwtBuilder = Jwts.builder()
	                .setId(userId) //jti(고유식별자)
	                .setAudience(REFRESH_TOKEN_AUDIENCE) // 토큰 대상자
	                .setIssuedAt(DateUtil.getNowDate()) //iat 발행날짜
	                .setSubject(REFRESH_TOKEN_SUBJECT) //sub 제목 
	                .setIssuer(REFRESH_TOKEN_ISSUER) // iss 발급자
	                .setExpiration(expiration) // exp 만료날짜
	                .signWith(signatureAlgorithm, signKey); // sign algo, key
	    
	    final String token =  jwtBuilder.compact();
	    
	    RefreshToken refreshToken = new RefreshToken();
	    refreshToken.setAuthentication(String.valueOf(user.getUserSeq()));
	    refreshToken.setToken(token);
	    
	    RefreshToken duplicationRefreshToken = refreshTokenDao.selectRefreshToken(refreshToken);
	    
	    int result = 0;
	    
	    if (null != duplicationRefreshToken) {
	    	refreshToken.setRefreshTokenSeq(duplicationRefreshToken.getRefreshTokenSeq());
	    	result = refreshTokenDao.updateRefreshToken(refreshToken);
	    } else {
	   	  	result = refreshTokenDao.insertRefreshToken(refreshToken);
	    }
	    
	    if (0 == result) {
	    	throw new CustomException(MessageProperties.prop("error.code.common.occured.exception")
					, MessageProperties.prop("error.message.common.occured.exception"));	
	    }
	    
		return token;
	}
	
	@Override
	public User checkRefreshToken(String refreshToken) throws Exception {
		if (null == refreshToken || "".equals(refreshToken)) {
			throw new CustomException(MessageProperties.prop("error.code.token.invalid")
					, MessageProperties.prop("error.message.token.invalid"));
		}
		
		byte[] secretKeyBytes = DatatypeConverter.parseBase64Binary(Base64.encodeBase64String(REFRESH_TOKEN_SECRET_KEY.getBytes()));
		Claims claims = null;
		claims = Jwts.parser()
					.setSigningKey(secretKeyBytes)
					.parseClaimsJws(refreshToken).getBody();
		
		Date expitration;
		Date now = DateUtil.getNowDate();
		String id;
		String issuer;
		String audience;
		
		
		if (null == claims.getExpiration()) {
			throw new CustomException(MessageProperties.prop("error.code.token.expiration.invalid")
					, MessageProperties.prop("error.message.token.expiration.invalid"));	
		}
		expitration = claims.getExpiration();
		 
		if (DateUtil.isBefore(expitration, now)) {
			throw new CustomException(MessageProperties.prop("error.code.token.expiration")
					, MessageProperties.prop("error.message.token.expiration"));
		}
		
		if (null == claims.getIssuer() ||  "".equals(claims.getIssuer())) {
			throw new CustomException(MessageProperties.prop("error.code.token.issuer.invalid")
					, MessageProperties.prop("error.message.token.issuer.invalid"));		
		}
		issuer = claims.getIssuer();
		
		if (!REFRESH_TOKEN_ISSUER.equals(issuer)) {
			throw new CustomException(MessageProperties.prop("error.code.token.issuer.invalid")
					, MessageProperties.prop("error.message.token.issuer.invalid"));
		}
		
		if (null == claims.getAudience() ||  "".equals(claims.getAudience())) {
			throw new CustomException(MessageProperties.prop("error.code.token.audience.invalid")
					, MessageProperties.prop("error.message.token.audience.invalid"));		
		}
		audience = claims.getAudience();
		
		if (!REFRESH_TOKEN_AUDIENCE.equals(audience)) {
			throw new CustomException(MessageProperties.prop("error.code.token.audience.invalid")
					, MessageProperties.prop("error.message.token.audience.invalid"));
		}
		
		if (null == claims.getId() ||  "".equals(claims.getId())) {
			throw new CustomException(MessageProperties.prop("error.code.token.id.invalid")
					, MessageProperties.prop("error.message.token.id.invalid"));		
		}
		id = claims.getId();	
		User user = userService.selectUserByUserId(id);
		
		if (null == user) {
			throw new CustomException(MessageProperties.prop("error.code.token.id.invalid")
					, MessageProperties.prop("error.message.token.id.invalid"));
		}	
		return user;
	}
}

Value 어노테이션을 사용하여 이전 과정에서 jwt.properties에 설정한 값들을 가져와서 멤버 변수에 주입합니다.
Access Token 은 6시간, Refresh Token은 30일에 만료 주기를 갖습니다.

SignatureAlgorithm은 HS256을 사용합니다.

  • getTokens 메서드
    액세스 및 리프레시 토큰 발행하는 메서드입니다.

  • getAccessToken 메서드
    JWT 액세스 토큰 생성하는 메서드입니다.

  • checkAccessToken 메서드
    JWT 액세스 토큰의 유효성 검사를 하는 메서드입니다.

  • refreshAccessToken 메서드
    JWT 액세스 토큰 재발행하는 메서드입니다.
    DAO를 호출하여 리프레시 토큰이 저장된 테이블을 조회하고
    중복이 있는 경우 토큰 정보만 업데이트하고 아닌 경우 정보를 저장합니다.

  • getRefreshToken 메서드
    JWT 리프레시 토근 발행하는 메서드입니다.

  • checkRefreshToken 메서드
    JWT 리프레시 토큰의 유효성 검사를 하는 메서드입니다.

14.3 User Service, Impl

package com.codejcd.service;

import com.codejcd.entity.User;

public interface UserService {
	/**
	 * 유저 조회
	 * @param userId
	 * @return
	 * @throws Exception
	 */
	public User selectUserByUserId(String userId) throws Exception;
	
	/**
	 * 유저 패스워드 확인
	 * @param userId
	 * @param password
	 * @return
	 * @throws Exception
	 */
	public User matchUserPassword(String userId, String password) throws Exception;
	
	/**
	 * 유저 등록
	 * @param userId
	 * @param userName
	 * @param password
	 * @return
	 * @throws Exception
	 */
	public int registUser(String userId, String userName, String password) throws Exception; 
}
package com.codejcd.service;

import org.springframework.beans.factory.annotation.Autowired;
import org.springframework.stereotype.Service;

import com.codejcd.common.CustomException;
import com.codejcd.common.CustomPasswordEncoder;
import com.codejcd.common.MessageProperties;
import com.codejcd.dao.UserDao;
import com.codejcd.entity.User;

@Service
public class UserServiceImpl implements UserService{
	
	@Autowired
	private CustomPasswordEncoder passwordEncoder;

	@Autowired
	private UserDao userDao;
	
	@Override
	public User selectUserByUserId(String userId) throws Exception {
		return userDao.selectUserByUserId(userId);
	}
	
	@Override
	public User matchUserPassword(String userId, String password) throws Exception {
		User user = userDao.selectUserByUserId(userId);
		
		boolean result = passwordEncoder.matches(password, user.getPassword());
		if (!result) {
			throw new CustomException(MessageProperties.prop("error.code.userPassword.invalid")
					, MessageProperties.prop("error.message.userPassword.invalid"));	
		}
		
		return user; 
	}
	
	@Override
	public int registUser(String userId, String userName, String password) throws Exception {
		password = passwordEncoder.encode(password);
		return userDao.registUser(userId, userName, password);
	}
	
	
}


  • selectUserByUserId 메서드
    유저 ID를 매개변수로 받아서
    DAO를 호출하여 유저 정보를 조회하는 메서드.

  • matchUserPassword 메서드
    유저 정보를 매개변수로 받아서 DAO를 호출하여
    저장된 유저 정보와 비교하여 패스워드를 일치 여부를 확인하는 메서드.

  • registUser 메서드
    유저 정보를 매개변수로 받아서 DAO를 호출하여 등록하는 메서드.

15. Client, Token, User Controller

RequestMapping을 통한 Service 호출을 위한 클래스입니다.

RestController 어노테이션을 통해 Bean 등록을 하고 JSON 포맷으로 데이터를 리턴합니다.


15.1 Client Controller

package com.codejcd.controller;

import org.springframework.beans.factory.annotation.Autowired;
import org.springframework.web.bind.annotation.RequestMapping;
import org.springframework.web.bind.annotation.RequestParam;
import org.springframework.web.bind.annotation.RestController;
import com.codejcd.common.CustomException;
import com.codejcd.common.MessageProperties;
import com.codejcd.common.Response;
import com.codejcd.service.ClientService;

/**
 * Client 컨트롤러
 */
@RestController
public class ClientController {

	@Autowired
	private ClientService clientService;
	
	/**
	 * Client 등록
	 * @param clientId
	 * @param clientSecret
	 * @return
	 */
    @RequestMapping("/client/regist")
    public Response clientRegist(@RequestParam(value="clientId", defaultValue="") String clientId,
    	@RequestParam(value="clientSecret", defaultValue="") String clientSecret) {
    	
    	Response response = new Response();
    	
    	try {
    		clientService.registClient(clientId, clientSecret);
        	response.setResponseCode(MessageProperties.prop("error.code.common.success"));
    		response.setResponseMessage(MessageProperties.prop("error.message.common.success"));
    	} catch(CustomException e) {
    		response.setResponseCode(MessageProperties.prop(e.getErrorCode()));
    		response.setResponseMessage(MessageProperties.prop(e.getErrorMessage()));
    	} catch(Exception e) {
            response.setResponseCode(MessageProperties.prop("error.code.common.occured.exception"));
            response.setResponseMessage(MessageProperties.prop("error.message.common.occured.exception"));
            e.printStackTrace();
    	} finally {
    		
    	}
    	return response;
    }
}


  • /client/regist
    ClientService의 registClient를 호출하여 Request로 전달받은 Client 데이터를 매개변수로 넘겨줍니다.
    Exception이 없으면 정상 응답 코드가 세팅되고, Exception 발생 시 try~catch~finally 문에 의해 처리됩니다.
    이번 편에서는 별도의 테스트 데이터 SQL이 없으므로 해당 API를 호출하여 client 값을 생성합니다.

15.2 Token Controller

package com.codejcd.controller;

import java.util.HashMap;
import org.springframework.beans.factory.annotation.Autowired;
import org.springframework.web.bind.annotation.RequestHeader;
import org.springframework.web.bind.annotation.RequestMapping;
import org.springframework.web.bind.annotation.RequestParam;
import org.springframework.web.bind.annotation.RestController;
import com.codejcd.common.CustomException;
import com.codejcd.common.MessageProperties;
import com.codejcd.common.Response;
import com.codejcd.entity.User;
import com.codejcd.service.ClientService;
import com.codejcd.service.TokenService;
import com.codejcd.service.UserService;

@RestController
public class TokenController {

	@Autowired
	private TokenService tokenService;
	
	@Autowired
	private UserService userService;
	
	@Autowired
	private ClientService clientService;
	
	/**
	 * 토큰 발급
	 * token generation
	 * @param authorization
	 * @param userId
	 * @param password
	 * @return
	 */
    @RequestMapping("/oauth2/tokens")
    public Response generateToken(@RequestHeader(value="Authorization") String authorization,
    			@RequestParam(value="userId", defaultValue="") String userId,
    			@RequestParam(value="password", defaultValue="") String password) {
    	
    	Response response = new Response();
    	HashMap<String, Object> result = new HashMap<>(); 
    	
    	try {   
    		// Basic Auth 검증 
    		clientService.checkClientByClientId(authorization);
    		// User 검증
    		User user = userService.matchUserPassword(userId, password);
    		// 토큰 생성
        	result = tokenService.getTokens(user);
        	response.setResponseCode(MessageProperties.prop("error.code.common.success"));
    		response.setResponseMessage(MessageProperties.prop("error.message.common.success"));
    		response.setResult(result);
    	} catch(CustomException e) {
    		response.setResponseCode(MessageProperties.prop(e.getErrorCode()));
    		response.setResponseMessage(MessageProperties.prop(e.getErrorMessage()));
    	} catch(Exception e) {
            response.setResponseCode(MessageProperties.prop("error.code.common.occured.exception"));
            response.setResponseMessage(MessageProperties.prop("error.message.common.occured.exception"));
            e.printStackTrace();
    	} finally {
    		
    	}
    	return response;
    }
    
    /**
     * 토큰 연장
     * token refresh
     * @param authorization
     * @param refreshToken
     * @return
     */
    @RequestMapping("/oauth2/accessToken/refresh")
    public Response refreshToken(@RequestHeader(value="Authorization") String authorization,
			@RequestParam(value="refreshToken", defaultValue="") String refreshToken) {
    	
    	Response response = new Response();
    	HashMap<String, Object> result = new HashMap<>();
    	String accessToken = "";
    	try {
    		clientService.checkClientByClientId(authorization);
    		accessToken = tokenService.refreshAccessToken(refreshToken);
    		
        	response.setResponseCode(MessageProperties.prop("error.code.common.success"));
    		response.setResponseMessage(MessageProperties.prop("error.message.common.success"));
    		result.put("accessToken", accessToken);
    		response.setResult(result);
      	} catch(CustomException e) {
    		response.setResponseCode(e.getErrorCode());
    		response.setResponseMessage(e.getErrorMessage());
    	} catch(Exception e) {
            response.setResponseCode(MessageProperties.prop("error.code.common.occured.exception"));
            response.setResponseMessage(MessageProperties.prop("error.message.common.occured.exception"));
    	} finally {
    		
    	}
    	return response;
    }
}


  • /oauth2/tokens
    ClientService, userService를 호출하여 각각 Request로 전달받은 Client 정보와 User 정보를 검증한다.
    이후 tokenService의 getTokens 메서드를 user 정보를 매개 변수로 하여 호출하여
    액세스 토큰을 발급받아 리턴합니다. 

  • /oauth2/accessToken/refresh
    Client 정보와 리프레시 토큰을 Request로 전달받아 검증 후 유효하면 Access Token을 리턴합니다.

15.3 User Controller

package com.codejcd.controller;

import org.springframework.beans.factory.annotation.Autowired;
import org.springframework.web.bind.annotation.RequestMapping;
import org.springframework.web.bind.annotation.RequestParam;
import org.springframework.web.bind.annotation.RestController;

import com.codejcd.common.CustomException;
import com.codejcd.common.MessageProperties;
import com.codejcd.common.Response;
import com.codejcd.service.UserService;

@RestController
public class UserController {
	
	@Autowired
	private UserService userService;

	/**
	 * 유저 등록
	 * @param userId
	 * @param userName
	 * @param password
	 * @return
	 */
    @RequestMapping("/user/regist")
    public Response clientRegist(@RequestParam(value="userId", defaultValue="") String userId,
    	@RequestParam(value="userName", defaultValue="") String userName,
    	@RequestParam(value="password", defaultValue="") String password) {
    	
    	Response response = new Response();
    	
    	try {
    		userService.registUser(userId, userName, password);
        	response.setResponseCode(MessageProperties.prop("error.code.common.success"));
    		response.setResponseMessage(MessageProperties.prop("error.message.common.success"));
    	} catch(CustomException e) {
    		response.setResponseCode(MessageProperties.prop(e.getErrorCode()));
    		response.setResponseMessage(MessageProperties.prop(e.getErrorMessage()));
    	} catch(Exception e) {
            response.setResponseCode(MessageProperties.prop("error.code.common.occured.exception"));
            response.setResponseMessage(MessageProperties.prop("error.message.common.occured.exception"));
            e.printStackTrace();
    	} finally {
    		
    	}
    	return response;
    }
}


  • /user/regist
    Request로 전달받은 유저 데이터를 userService의 registerUser를 호출하여 매개변수로 전달하여
    유저 정보를 등록하고 결과를 리턴합니다. 
    이번 편에서는 유저 생성하는 SQL 이 없으므로 해당 API를 호출하여 유저 정보를 등록합니다.


16. 테스트 

Client와 User 정보 등록 후 Token이 정상 발급되는지 확인해보겠습니다.

테스트 툴로는 POSTMAN을 사용했습니다.


http://localhost:8095/client/regist API를 body 정보를 세팅하고 호출합니다.

정상적으로 처리되어 200 OK 응답과 함께 커스텀 코드와 메시지를 확인 가능합니다.


http://localhost:8095/user/regist API를 body 정보를 세팅하고 호출합니다.

정상적으로 처리되어 200 OK 응답과 함께 커스텀 코드와 메시지를 확인 가능합니다.

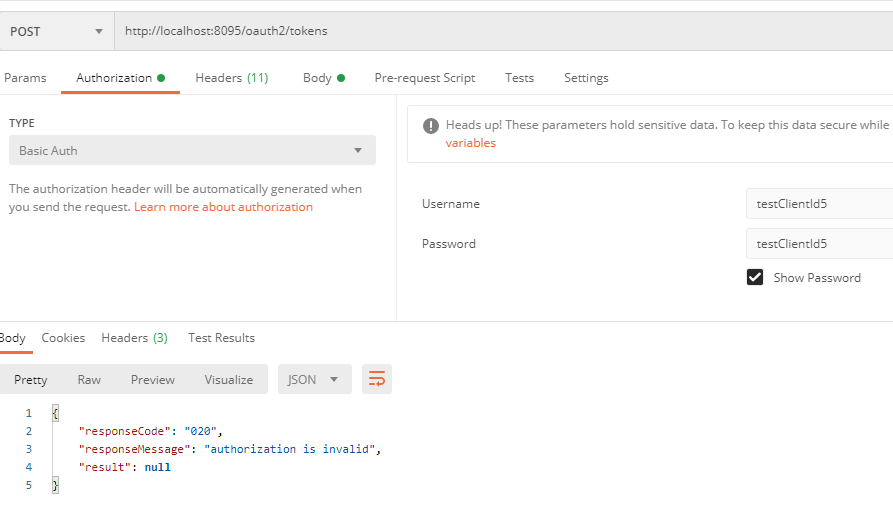
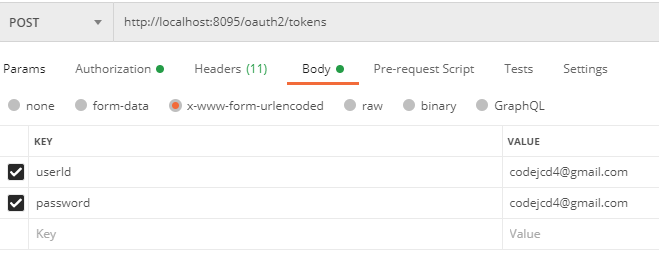
http://localhost:8095/oauth2/tokens API를 등록하지 않은 값을 세팅하고 호출해봅니다.

커스텀 Exception 처리한 메시지를 확인 가능합니다.

이번에는 잘못 등록한 값을 제대로 세팅하고 호출합니다.

정상적으로 토큰이 발급된 것을 확인 가능합니다.

header Basic Auth
Http Body
Http Resonse


블로그에서는 간단하게 테스트하는 방법을 보여드렸고,

실제로는 여러 가지 상황을 가정해서 테스트 케이스를 만들고
더 상세하게 테스트해봐야 합니다.


17. 마치며
이번 글에서는 Spring Security Oauth 없이 

Basic Auth에 대한 처리와 Access, Refresh Token을 생성하는 기능을 구현해봤습니다.
다음 글에서는 Resource Server를 구현해보고 이상 이번 시리즈를 마치겠습니다.

+ Recent posts